
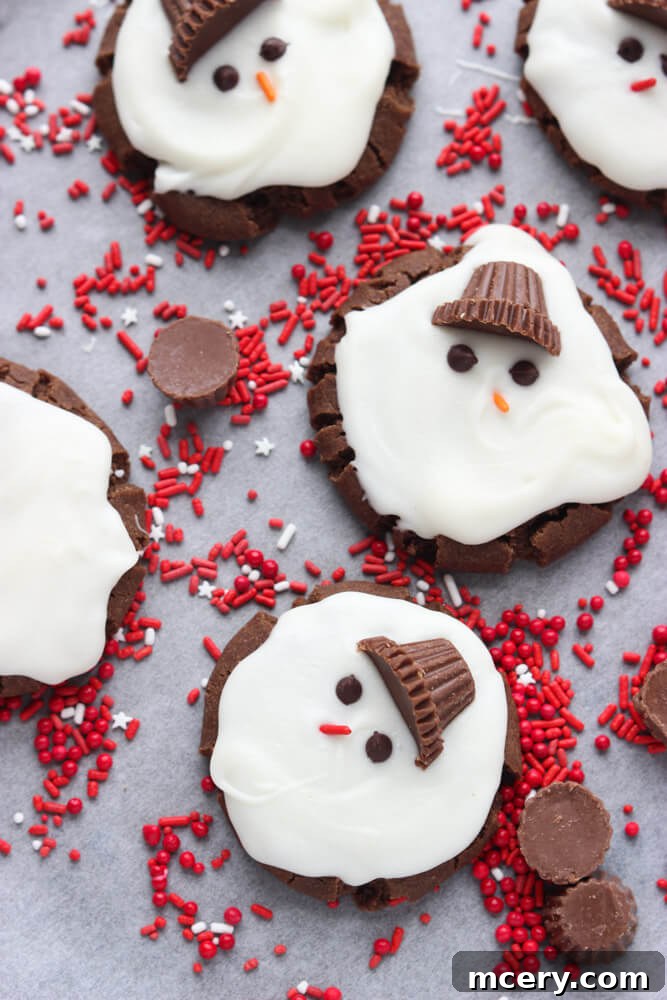
Welcome to the enchanting world of holiday baking, where simple ingredients transform into magical, memorable treats! These delightful Melted Snowman Cookies are a joyous fusion of rich chocolate and creamy peanut butter, topped with silky white chocolate “snow” and adorable, handcrafted details. More than just a dessert, they are a heartwarming experience, perfect for sparking festive cheer and creating cherished memories with loved ones, especially the little bakers in your life. Get ready to bake up some smiles!
These melted snowman cookies are, without a doubt, one of the most fun and engaging recipes you’ll tackle this holiday season! The foundation is a wonderfully straightforward chocolate and peanut butter drop cookie dough. There’s no need for fancy tools, intricate rolling pins, or complicated techniques, making them an ideal project to enjoy with children. Imagine their delight as they help bring these charming snowmen to life!
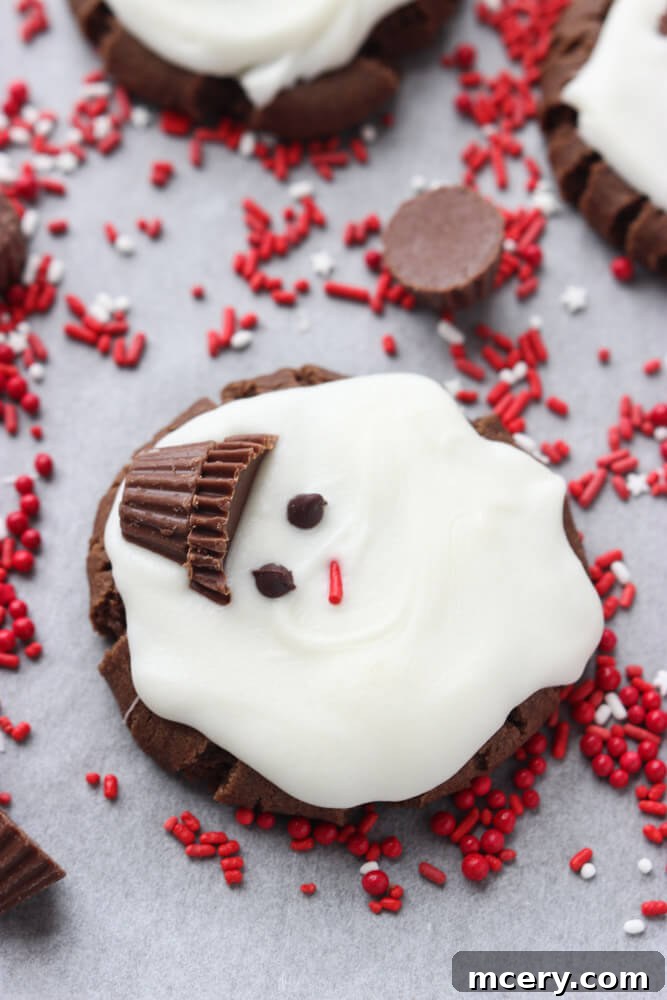
Each bite offers a sublime combination of a soft, chewy cookie bursting with classic chocolate and peanut butter flavor. This delectable base is then generously crowned with a smooth, “melted” white chocolate topping, artfully decorated with miniature peanut butter cups forming cute hats, tiny chocolate chips for sparkling eyes, and colorful sprinkles that become their carrot noses. The result is a truly delicious and visually captivating treat that’s impossible to resist.
Why You’ll Adore This Melted Snowman Cookies Recipe
These cookies aren’t just a treat; they’re a celebration in every bite! Here’s why they’re destined to become a beloved part of your holiday tradition:
- Unleash Festive Fun: These melting snowmen cookies are an instant hit, especially with children. Their whimsical appearance brings an immediate sense of holiday magic to any table, making them perfect for family gatherings, school parties, or a cozy evening in.
- Effortlessly Homemade: Forget complicated recipes! The cookie dough comes together with common pantry staples and bakes into a soft, chewy masterpiece without requiring any advanced baking skills. It’s a truly approachable recipe for bakers of all levels.
- Perfect for Gifting & Parties: These cookies are not only delightful to look at but also robust enough to hold their shape, making them easy to transport. Package them charmingly for cookie swaps, thoughtful gifts for neighbors and teachers, or a festive addition to any holiday buffet.
- Irresistible Flavor Combination: The timeless pairing of rich chocolate and creamy peanut butter creates a deeply satisfying flavor profile that appeals to everyone. Coupled with the sweet white chocolate topping, it’s a symphony of tastes and textures.
- A Creative Canvas: Beyond their deliciousness, these cookies offer a fantastic opportunity for creativity. Decorating them is a joyful activity that encourages imagination, allowing each snowman to have its own unique personality.
Essential Ingredients for Your Melted Snowman Cookies
To embark on this delightful baking adventure, gather the following ingredients. Ensuring they are at the correct temperature, especially butter and eggs, will contribute to a smoother, more consistent dough.
For the Rich Chocolate Peanut Butter Cookie Base:
- Unsalted Butter: ½ cup (1 stick), softened to room temperature for optimal creaming.
- Creamy Peanut Butter: ½ cup, choose your favorite brand for that classic flavor.
- Cane Sugar: ½ cup, for a balanced sweetness.
- Brown Sugar: ½ cup, packed, to add moisture and a lovely molasses note.
- Baking Powder: 1 teaspoon, for lift and a tender crumb.
- Baking Soda: 1 teaspoon, to react with the cocoa and brown sugar, ensuring perfect texture.
- Salt: ¼ teaspoon, to enhance all the flavors and balance the sweetness.
- Egg: 1 large, at room temperature, to bind the ingredients.
- Milk: 3 tablespoons, any type will work, adding tenderness.
- Vanilla Extract: ½ teaspoon, for a touch of warmth and aromatic depth.
- Unsweetened Cocoa Powder: ¼ cup, providing intense chocolate flavor.
- All-Purpose Flour: 1 ½ cups, the structural foundation of your cookies.
For the Smooth White Chocolate “Melted Snow” Topping:
- Good-Quality White Chocolate: 8-10 ounces, chopped or in chip form for easy melting.
- Coconut Oil: 1 teaspoon, helps create a smooth, glossy finish for your melted white chocolate.
For the Adorable Snowman Decorations:
- Miniature Peanut Butter Cups: Unwrapped, halved vertically, with the tops sliced off to form cute hats.
- Mini Chocolate Chips: For the snowman’s expressive eyes.
- Orange, Red, or Brown Sprinkles: “Jimmies” work best for creating charming carrot noses.
How to Create Your Adorable Melted Snowman Cookies
Get ready to transform simple ingredients into festive edible art! This step-by-step guide will walk you through making the perfect chocolate peanut butter cookies and decorating them into charming melting snowmen.
Part 1: Crafting the Irresistible Cookie Base
The secret to a truly great cookie lies in the preparation of the dough. Follow these steps for a perfectly blended and flavorful base.
- In a spacious mixing bowl, combine the softened butter and creamy peanut butter. Using an electric mixer, beat these two until they are light and fluffy, usually on high speed for about 1-2 minutes.
- Next, introduce both the cane sugar and brown sugar, along with the baking powder, baking soda, and salt. Continue to beat the mixture until all ingredients are thoroughly incorporated and the texture is smooth and creamy.
- Beat in the room temperature egg, milk, and vanilla extract until just combined. Be careful not to overmix at this stage.
- Reduce your mixer speed to low and gradually add the cocoa powder and all-purpose flour. Mix until the flour streaks have just disappeared. Overmixing flour can lead to tough cookies, so stop as soon as it’s incorporated.
Part 2: Shaping and Baking to Perfection
Achieving uniformly baked and perfectly shaped cookies is key to the melted snowman effect. Pay attention to these steps for optimal results.
- Preheat your oven to 350°F (175°C). Line a large baking sheet with parchment paper to prevent sticking and ensure even baking. Set this aside.
- Using a rubber spatula, scrape down the sides of your mixing bowl, bringing the dough together into a single, cohesive ball. Then, divide this dough ball into two equal halves.
- With clean hands, take one half of the dough and gently roll it into a 13-inch long log. Once you have a uniform log, use a knife to cut it into 10 even slices. Shape each slice into a smooth ball and place them approximately 2 inches apart on your prepared baking sheet. Repeat this process with the second dough ball, yielding a total of 20 cookies.
Pro Tip: Uniformity Matters! Rolling the dough into a log and then slicing it is a fantastic way to ensure all your cookies are roughly the same size, which helps them bake evenly. If you prefer a quicker method, a two-tablespoon cookie scoop or even a melon-baller can also be used to portion the dough. Drop cookies are wonderful for their speed and simplicity!
- Bake the cookies for 8 minutes. After this initial bake time, remove the baking sheet from the oven. Gently and lightly flatten the tops of the cookies using the back of a non-stick spatula or a spoon. This step is crucial for creating a slightly flatter surface for your melted snow effect. Return the cookies to the oven and bake for an additional 2-3 minutes, or until the edges are lightly golden and set.
- Once baked, remove the cookies from the oven and allow them to cool on the baking sheet for about 5 minutes. This helps them firm up slightly before you transfer them to a wire rack to cool completely. Ensuring they are completely cool is vital before proceeding to decoration, otherwise, your white chocolate “snow” will melt!
Part 3: Bringing Your Snowmen to Life: The Fun Decoration Phase
This is where the magic happens! Get creative and have fun transforming your cookies into charming melted snowmen.
- Prepare your white chocolate topping. In a microwave-safe bowl, melt the good-quality white chocolate. Heat in 30-second intervals, stirring thoroughly after each interval, until the chocolate is completely smooth and free of lumps. Once melted, stir in the coconut oil; this will give the chocolate a beautiful sheen and a slightly thinner consistency, perfect for drizzling.
- Prepare the snowman hats. Unwrapper your miniature peanut butter cups. Carefully slice each cup in half vertically. Then, slice off the very top, creating a flat base for the hat to rest on the cookie.
- Now, it’s time to decorate! Spoon a generous amount of the melted white chocolate over the top of each completely cooled cookie, allowing it to drip slightly over the sides to create the illusion of melting snow. Immediately place one of your prepared peanut butter cup hats onto the “snow” (towards the top edge of the cookie). Add two mini chocolate chips for the snowman’s eyes and a single sprinkle (orange, red, or brown work best for a carrot nose effect) for the nose. (Note: While green sprinkles can work in a pinch, orange, red, or brown truly give the best “carrot” effect for the nose. Don’t be afraid to improvise with what you have!)
- Allow the decorated cookies to set at room temperature until the white chocolate has hardened. This can take an hour or two, or you can speed up the process by placing them in the refrigerator for 15-20 minutes.
Planning Ahead: Make-Ahead Tips for Melted Snowman Cookies
Holiday baking can be busy, so these cookies offer great flexibility for making them in advance:
- Bake Ahead: The chocolate peanut butter cookies can be baked up to 3-4 days in advance. Store them in an airtight container at room temperature. When you’re ready to decorate, simply follow the steps for melting the white chocolate and adding the festive touches.
- Dough Preparation: You can prepare the cookie dough a day or two in advance and keep it refrigerated. Bring it back to room temperature for about 30 minutes before rolling and baking.
Creative Variations to Personalize Your Snowmen
While the classic chocolate and peanut butter snowman is a star, this recipe is incredibly adaptable! Feel free to customize your melting snowmen to suit your taste and creativity:
- Chocolate Chip Surprise: Instead of cocoa powder in the dough, you could melt chocolate chips and incorporate them for a different texture. This works well with both semi-sweet or milk chocolate chips.
- Olaf-Inspired Snowmen: For fans of Frozen, create Olaf! Use an orange sprinkle for a carrot nose, and use black gel icing or melted dark chocolate in a piping bag to draw thin stick arms and a friendly smile.
- Marshmallow Heads: For a more pronounced snowman “head” effect, place a large, halved marshmallow on top of the melted white chocolate (before it sets). Use black edible marker or gel icing to draw the snowman’s face directly onto the marshmallow.
- Button Up!: Add miniature M&Ms or extra mini chocolate chips down the “front” of the cookie for little snowman buttons.
- Nutty Flavor Boost: A splash of almond extract (¼ teaspoon) added to the cookie batter can introduce another layer of delicious flavor, complementing the chocolate beautifully.
- Gingerbread Snowmen: For a different base, use your favorite gingerbread cookie recipe. Once baked and cooled, top with white chocolate and snowman decorations for a spicy twist.
- Coconut Snow: Lightly sprinkle shredded coconut on top of the wet white chocolate for an extra snowy texture and flavor.
- Candy Corn Noses: If you’re feeling extra playful, a small piece of candy corn can make a vibrant orange carrot nose!
Melted Snowman Recipe Tips for Success
Follow these expert tips and tricks to ensure your melting snowman cookies turn out perfectly every time, from baking to decorating!
- Gentle White Chocolate Melting: When melting white chocolate, low and slow is key. Microwave in short bursts (30 seconds at a time) and stir well between each interval to prevent burning or seizing. The coconut oil helps achieve a silky-smooth consistency ideal for spreading.
- Room Temperature Ingredients: Always allow butter, eggs, and any dairy (like milk) to come to room temperature before mixing. This ensures they emulsify properly, creating a smooth, uniform batter and ultimately, a better-textured cookie.
- Peanut Butter Choice: You can use your favorite creamy peanut butter. If opting for natural peanut butter, remember to stir it very well before measuring to fully incorporate any separated oil.
- Pre-cut Decorations: Save time during the decorating phase by preparing your peanut butter cup hats and having your mini chocolate chips and sprinkles ready while the cookies are cooling.
- Cool Completely: Patience is a virtue here! Ensure your cookies are entirely cool to the touch – at least an hour – before applying the melted white chocolate. Warm cookies will cause the chocolate to melt and make a mess.
- Sprinkle Smart: For the most adorable carrot noses, opt for orange, red, or even brown “jimmie” sprinkles. These elongated shapes mimic carrots better than round sprinkles. You can even find snowman-themed sprinkle mixes from baking brands like Wilton if you want to add more flair.
- Parchment Paper is Your Friend: Lining your baking sheets with parchment paper not only makes cleanup a breeze but also helps prevent the cookies from sticking and promotes even baking.
- Don’t Overmix the Dough: Once you add the flour, mix only until just combined. Overmixing develops the gluten, leading to tougher cookies.
How to Serve Your Charming Snowman Cookies
These adorable melted snowman cookies are more than just a treat; they’re conversation starters! They are perfectly suited for a myriad of holiday occasions:
- Holiday Parties: Bring a plate of these to any Christmas or winter-themed party, and watch them disappear! They’re guaranteed to be a crowd-pleaser and a festive focal point.
- Cookie Exchanges: Stand out at your next cookie swap with these unique and delightful creations.
- Thoughtful Gifts: Package them in pretty bags or boxes for heartfelt gifts to neighbors, friends, teachers, or colleagues. Handmade cookies always convey warmth and care.
- School Bake Sales: A surefire hit at any school fundraiser, appealing to both kids and adults alike.
- Family Dessert: Simply enjoy them with your family after a festive meal or as a special treat on a cold winter’s night. A mug of hot cocoa pairs wonderfully!
Looking for more holiday delights to sweeten your season? Try these other fantastic recipes:
- Peanut Butter Clusters: A simple yet addictive sweet and salty treat.
- Poppyseed Rugelach: Elegant, flaky pastries filled with sweet poppyseed.
- Hershey’s Peanut Butter Blossoms: A classic peanut butter cookie adorned with a chocolate kiss.
Storing Your Melted Snowman Cookies
Proper storage ensures your festive cookies remain fresh and delicious for as long as possible.
- Refrigerate: For optimal freshness and to keep the white chocolate topping firm, store any leftover melted snowman cookies in an airtight container in the refrigerator for up to 5 days. You can also store them at cool room temperature for 3-4 days if your home isn’t too warm.
- Freeze: These cookies are excellent candidates for freezing, making them perfect for preparing well in advance of the busy holiday season.
You have a couple of options for freezing:
- Before Decorating: For the easiest freezing method, freeze the baked, un-decorated cookies. Once completely cooled, place them in a single layer on a baking sheet and flash freeze for about 30 minutes until solid. Then transfer them to a freezer-safe airtight container or bag. They can be frozen for up to 2-3 months. When ready to serve, thaw them on the counter for a few hours, then decorate as per the instructions.
- After Decorating: If you want to freeze them fully decorated, ensure the white chocolate is completely set and firm. Then, flash freeze them as described above before transferring them to an airtight freezer container. Layer them carefully with parchment paper in between to prevent sticking and damage to the decorations. They can also be frozen for 2-3 months.
When ready to enjoy frozen decorated cookies, simply allow them to thaw for a few hours on the counter. The festive tidbits will be ready to delight!
Melted Snowman Cookies Recipe: Frequently Asked Questions
Do I need to refrigerate the cookie dough before baking these melted snowmen cookies?
No, there’s absolutely no need to chill the dough first! One of the joys of this recipe is that you can bake these delightful cookies right away, making it a perfect spontaneous baking project.
How long do snowmen cookies need to cool before icing them?
It is crucial that the cookies are completely cool to the touch before you begin decorating them. This usually takes at least one hour at room temperature. Rushing this step will cause your melted white chocolate “snow” to run and create a messy, unappealing result.
What flavor are melted snowman cookies?
This particular recipe features a wonderfully comforting combination of chocolate and peanut butter, a flavor pairing that’s universally loved. However, the beauty of the “melted snowman” concept is its versatility! You can use any cookie base you like – sugar cookies, shortbread, or even a different flavor of drop cookie – and still transform them into these fun, festive treats.
Can I use different types of chocolate for the melted snow?
While white chocolate creates the most authentic “snow” effect, you could experiment with milk chocolate or dark chocolate for a different aesthetic and flavor. Just be aware that the color will change the overall look significantly. Ensure you use good quality melting chocolate or chocolate chips for best results.
How many cookies does this recipe yield?
This recipe typically yields about 20 delightful melted snowman cookies, perfect for sharing, gifting, or enjoying throughout the holiday season.
More Delicious Cookie Recipes to Explore
If you loved making these festive snowmen, you might also enjoy these other delightful recipes perfect for any occasion:
- Christmas Chocolate Covered Pretzels: A quick and easy sweet and salty treat.
- Dark Chocolate Cranberry Almond Biscotti: Perfect for dipping in coffee or tea.
- Classic Fig Cookies: A timeless, chewy cookie filled with sweet fig paste.
- Festive Christmas Cake Pops: Fun, bite-sized delights that are always a hit.
Melted Snowman Cookies Recipe Card

Melted Snowman Cookies
Chocolate and peanut butter melted snowman cookies topped with white chocolate and peanut butter cup. Not only are these fun to make but they’re also really delicious!
- Author: Katya
- Prep Time: 1 hour
- Cook Time: 10 mins
- Total Time: 1 hour 10 mins
- Yield: 20 cookies
- Category: Dessert
- Method: Baked
- Cuisine: American
Ingredients
- ½ cup unsalted butter, at room temperature
- ½ cup creamy peanut butter
- ½ cup cane sugar
- ½ cup brown sugar, packed
- 1 teaspoon baking powder
- 1 teaspoon baking soda
- ¼ teaspoon salt
- 1 egg
- 3 tablespoon milk
- ½ teaspoon vanilla extract
- ¼ cup unsweetened cocoa powder
- 1 ½ cup all-purpose flour
- 8-10 oz good-quality white chocolate
- 1 teaspoon coconut oil
- Miniature peanut butter cups (unwrapped, halved vertically, and tops sliced off)
- Mini chocolate chips
- Orange, red, or brown sprinkles “jimmies”
Instructions
- Preheat the oven to 350 degrees F (175°C). Line a large rimmed baking sheet with parchment paper.
- In a large bowl, beat softened butter and creamy peanut butter with an electric mixer on high speed until light and fluffy. Add cane sugar, brown sugar, baking powder, baking soda, and salt; beat until well combined and creamy.
- Beat in the egg, milk, and vanilla extract until just incorporated. On low speed, gradually beat in the cocoa powder and all-purpose flour until no streaks of flour remain, being careful not to overmix.
- Scrape down the bowl with a rubber spatula, gathering the dough into one ball. Divide the dough into two equal halves. Roll the first half into a 13-inch log, then cut into 10 even slices. Shape each slice into a ball and place them 2 inches apart on the prepared baking sheet. Repeat with the second dough half.
- Bake for 8 minutes. Remove the cookies from the oven and gently flatten the tops with a non-stick spatula. Return to the oven and bake for an additional 2-3 minutes, until edges are lightly golden.
- Remove from the oven and let cool on the baking sheet for 5 minutes, then transfer to a wire rack to cool completely. (This is essential before decorating!)
- In a microwave-safe bowl, melt the white chocolate in 30-second intervals, stirring after each, until smooth. Stir in the coconut oil until well combined and glossy.
- Prepare the snowman hats by unwrapping miniature peanut butter cups, slicing them in half vertically, and then slicing off the very top to create a flat base.
- Spoon a little melted white chocolate over each cooled cookie, allowing it to spread and resemble melting snow. Immediately place a peanut butter cup hat onto the melted chocolate. Add two mini chocolate chips for eyes and a sprinkle for the nose.
- Allow the decorated cookies to set at room temperature (or in the refrigerator for quicker setting) until the white chocolate is firm. Store in an airtight container for up to 4 days.
Nutrition Information (per 1 cookie serving)
- Serving Size: 1 cookie
- Calories: 243
- Sugar: 19.4 g
- Sodium: 149.6 mg
- Fat: 13.6 g
- Carbohydrates: 28.6 g
- Protein: 4.1 g
- Cholesterol: 24.1 mg
Did you make this recipe?
Tag @littlebrokenblog on Instagram and hashtag it #littlebrokenblog