
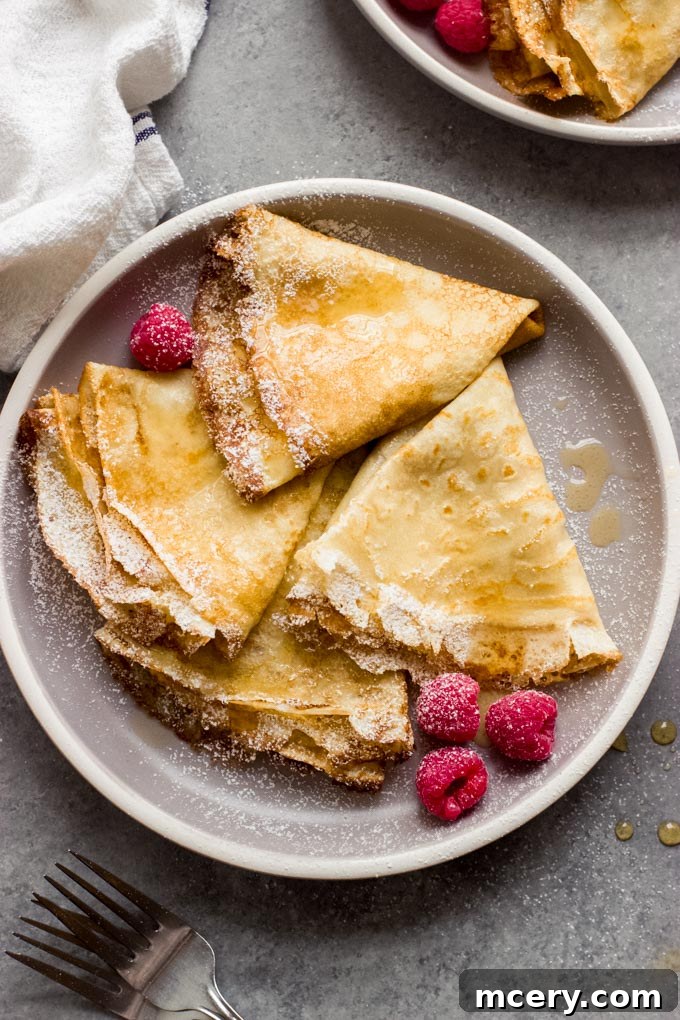
Traditional Russian blini are a culinary marvel: delicate, thin, and often compared to French crêpes, yet possessing their own distinct charm. While both are thin pancakes, blini typically present a slightly thicker, more tender texture and are often smaller in diameter than their French counterparts, designed to be easily rolled or folded around a variety of fillings. Their versatility makes them a beloved staple in Russian cuisine, enjoyed for breakfast, dessert, or even as a savory snack.
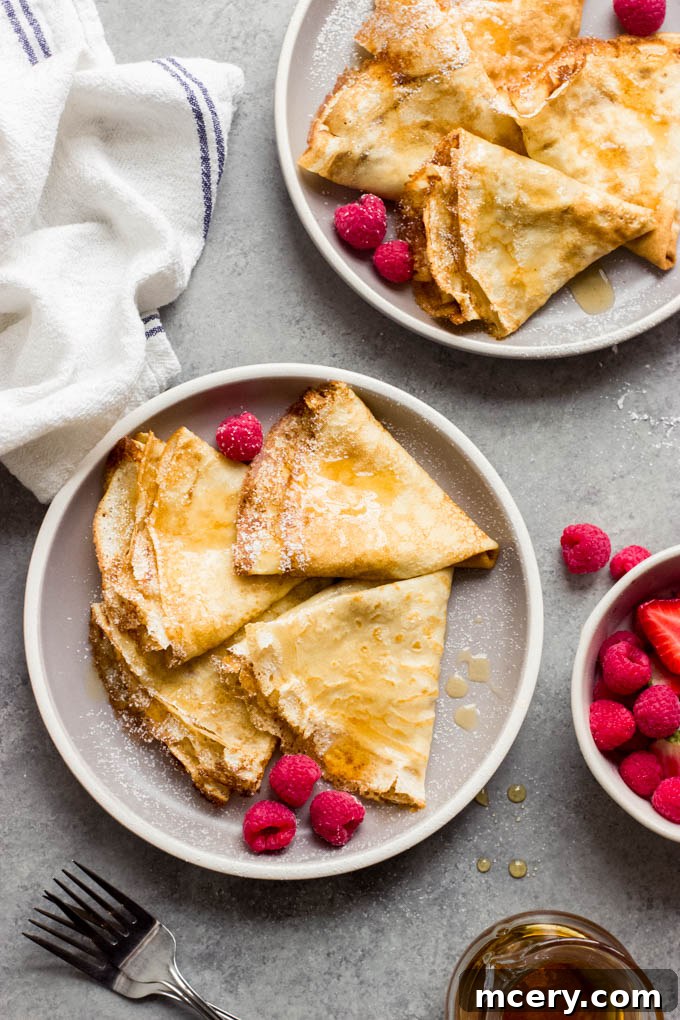
Discover the Irresistible Charm of Authentic Russian Blini!
Growing up in a Russian household, the aroma of freshly made blini was a comforting prelude to cherished family moments. This particular recipe, a treasured heirloom passed down from my mother, holds a special place in my heart. She spent years perfecting it, transforming it into a reliable, no-fail method that I eagerly looked forward to on countless mornings. Now, as a parent, I find immense joy in continuing this tradition, preparing a warm batch of these delightful Russian pancakes for my own children nearly every Saturday. It’s more than just a recipe; it’s a connection to heritage, a taste of home, and a legacy of love.
This tried-and-true recipe, crafted from readily available, basic ingredients, has been tested innumerable times to ensure consistent, perfect results. By following my step-by-step guidance and proven tips, you’re guaranteed to create blini that are soft, delicate, and utterly delicious. What’s more, these pancakes store exceptionally well, making them ideal for meal prepping. You can easily whip up a large batch over the weekend and savor the exquisite taste for several days, proving why this recipe is destined to become your ultimate go-to for authentic, mouth-watering blini.
What Exactly is a Blini (Russian Pancake)?
Blini, or sometimes affectionately called blinchiki, are delicate, pan-sized pancakes hailing from Russia. They are significantly thinner and wider than the fluffy, often thick American-style pancakes, yet typically possess a slightly more substantial texture than the paper-thin French crêpe. This unique characteristic positions blini perfectly between the two, offering a satisfying bite that is both tender and resilient.
Beyond their distinctive texture, blini are celebrated for their incredible versatility. While delicious on their own, they truly shine when paired with traditional accompaniments like a dollop of rich sour cream and a spoonful of sweet berry jam. However, their true culinary potential is unlocked when they are stuffed. Whether filled with a sweet blend of cottage cheese and raisins for a delightful dessert, or a savory mix of ground meat, mushrooms, or even caviar for a more sophisticated dish, blini adapt beautifully to any flavor profile. Today, I am thrilled to share my family’s favorite sweet blini recipe—a delightful creation that results in lightly sweetened, incredibly soft, and exceptionally delicate pancakes. We love enjoying them with a generous drizzle of maple syrup, an assortment of fresh fruits, or the classic touch of sour cream.
Essential Ingredients for Perfect Russian Blini
Crafting authentic Russian blini requires only a handful of everyday ingredients that you likely already have in your pantry. The simplicity of the ingredient list belies the rich flavor and delicate texture they produce. For this truly exceptional Russian blini recipe, gather the following:
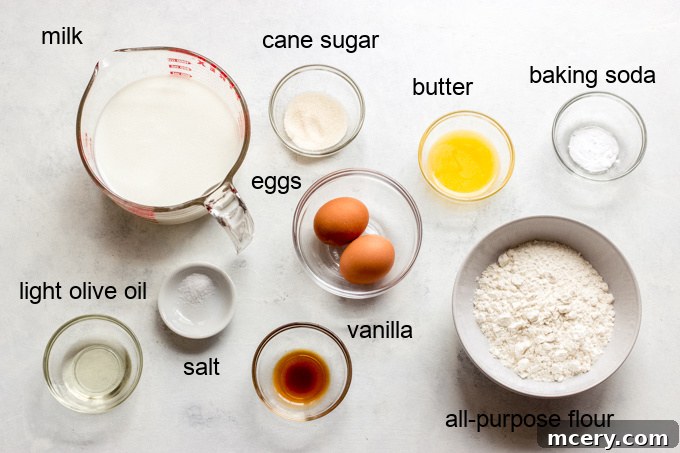
- Eggs: Large eggs provide structure and richness to the batter, contributing to the blini’s delicate texture.
- Milk: Whole or 2% milk is recommended. Crucially, the milk should be lukewarm. Gently warming it (about 1 minute in the microwave) helps activate the baking soda and creates a smoother, more cohesive batter.
- Cane Sugar: Adds a subtle sweetness that balances the flavors. Honey can be used as a delicious alternative for a different depth of sweetness.
- Kosher Salt: A pinch of salt enhances all the other flavors in the blini, preventing them from tasting flat.
- Baking Soda: This leavening agent reacts with the lukewarm milk and other ingredients to create light, airy blini with delicate bubbles.
- Light Olive Oil: Or refined coconut oil. Choose a neutral-tasting oil to ensure it doesn’t overpower the subtle flavors of the blini. Refined coconut oil is excellent as it lacks the distinct coconut flavor of virgin varieties.
- Butter: Melted butter adds a wonderful richness and helps achieve that characteristic tender texture.
- All-Purpose Flour: The foundation of our blini batter, providing structure and body.
- Vanilla Extract: A splash of vanilla elevates the aroma and adds a warm, inviting flavor, especially perfect for sweet blini.
For the best results, you will also need a high-quality 10-inch non-stick skillet or a dedicated crepe pan. These specialized pans ensure even heat distribution and prevent sticking, making the cooking process much smoother. Additionally, a flexible rubber turner is an invaluable tool for gently lifting and flipping the delicate blini without tearing them, ensuring picture-perfect results every time.
Mastering the Art of Blini: Step-by-Step Guide
Creating perfect blini is a rewarding culinary experience, and with these clear, detailed steps, you’ll be swirling and flipping like a pro in no time. Precision in technique, especially with batter consistency and heat management, is key to achieving those coveted golden, lacy edges.
- Combine Wet Ingredients: In a generously sized mixing bowl, begin by whisking the eggs until they are lightly scrambled and homogenous. This initial whisking helps create a smoother batter. Next, pour in the lukewarm milk. Ensure the milk isn’t hot, just gently warmed, as this helps prevent the eggs from cooking and assists in blending the ingredients seamlessly.
- Add Sweeteners and Leavening: To the egg and milk mixture, add the sugar, salt, baking soda, light olive oil, and melted butter. Whisk all these ingredients together thoroughly until they are well combined. The sugar should dissolve, and the oil and butter should be fully incorporated into the liquid mixture.
- Incorporate Flour and Vanilla: Begin to gradually whisk in the all-purpose flour. It’s important to add the flour slowly to prevent lumps from forming. Continue whisking diligently until the flour is completely incorporated, resulting in a perfectly smooth batter with no visible dry patches or lumps. Finally, stir in the vanilla extract for that irresistible aroma and flavor. The finished batter should have a distinctive consistency: it will feel heavy and thick, much like the richness of heavy cream, yet pourable enough to spread evenly in the pan.
- Cook the Blini: Heat a 10-inch non-stick skillet or a dedicated crepe pan over medium heat. It’s crucial to find the right temperature – too high and they’ll burn; too low and they’ll be tough. Lightly spray the pan with non-stick oil before each blini, or occasionally as needed. Pour exactly ¼ cup of batter into the very center of the hot pan. Immediately, and with a swift motion, swirl the pan in a circular motion to allow the batter to spread thinly and evenly across the entire surface, forming a perfect circle.
- Flip and Finish: Allow the blini to cook for approximately 30 seconds on the first side. You’ll know it’s ready to flip when the edges become visibly golden and acquire a delicate, lacy appearance. The center of the blini will also appear set and dry, with no liquid batter remaining. Using your flexible rubber turner, gently loosen the edges, then carefully flip the blini over in one fluid motion. Cook for an additional 20 seconds on the second side, just until the batter is fully set and lightly golden. Transfer the cooked blini to a clean platter. Continue this process with the remaining batter, remembering to lightly spray the pan with non-stick oil as needed to prevent sticking. If you notice the blini browning too quickly, slightly reduce the heat to maintain an even cooking temperature. Don’t be discouraged if your first blini isn’t perfectly round or golden – it’s a common occurrence even for experienced cooks! You should yield approximately 14 beautiful blini from this recipe.
Delightful Topping Ideas for Your Russian Blini
One of the true joys of blini lies in their incredible versatility when it comes to toppings. While traditionally served immediately or at room temperature, their neutral yet inviting flavor profile makes them a perfect canvas for both sweet and savory accompaniments. In our home, we often enjoy them in a manner similar to American pancakes, adorned with rich maple syrup and an abundance of fresh, seasonal fruit. However, the possibilities are virtually endless. Explore these popular and delicious ways to enjoy your homemade blini:
- Cottage Cheese: A classic Russian filling, often sweetened with a touch of sugar and vanilla, sometimes mixed with raisins, creating a creamy and delightful contrast.
- Greek Yogurt: A lighter, tangier alternative to sour cream, offering a refreshing complement to the blini’s sweetness.
- Sour Cream (Smetana): The quintessential blini topping. Its rich, slightly tangy profile provides a perfect balance to both sweet and savory blini.
- Jam or Preserves: From tart raspberry to sweet apricot, any fruit jam makes a wonderfully simple and flavorful topping.
- Honey: A golden drizzle of honey adds natural sweetness and a beautiful sheen.
- Whipped Cream: For an indulgent dessert experience, a dollop of fluffy whipped cream transforms blini into a true treat.
- Drizzle of Chocolate: Melted chocolate or a chocolate syrup offers a decadent touch, especially when paired with fruit.
- Nut Butter: Peanut butter, almond butter, or cashew butter provides a protein-rich and satisfying topping, often excellent with banana slices.
- Fresh Berries: Strawberries, blueberries, raspberries, or sliced bananas add freshness, natural sweetness, and vibrant color.
- Smoked Salmon and Dill: For a sophisticated savory option, thinly sliced smoked salmon, a dollop of sour cream or cream cheese, and fresh dill sprigs are a classic pairing, especially with slightly less sweetened blini.
Storing and Reheating Your Delicious Russian Blini
One of the many advantages of this blini recipe is how well the pancakes keep, allowing you to enjoy them for days to come. Proper storage ensures they retain their delicate texture and flavor.
Storage: Leftover blini, without any toppings or fillings, will remain fresh and delicious in the refrigerator for approximately 2-3 days. To store them effectively, allow the blini to cool completely to room temperature. Then, stack them with small pieces of parchment paper in between each blini to prevent them from sticking together. Place the stack in an airtight container or wrap them tightly in plastic wrap. This method helps maintain their moisture and prevents them from drying out.
Reheating: You have a few excellent options for reheating blini, depending on how many you have and your preferred method:
- Oven Method (Recommended for Larger Batches): Preheat your oven to 325°F (160°C). Arrange the blini in a single layer or stacked on an oven-safe plate or baking sheet. Cover them loosely with aluminum foil to prevent them from drying out. Heat for 10 to 15 minutes, or until they are thoroughly warmed through and soft. This method is fantastic for large quantities as it heats them evenly without making them rubbery.
- Microwave Method (For Quick Reheating): For a few blini, the microwave is a fast and convenient option. Place 1-3 blini on a microwave-safe plate. Cover them with a damp paper towel or microwave-safe lid to help retain moisture. Heat for 20-30 seconds, or until warmed through. Be careful not to overheat, as this can make them tough.
- Stovetop Method (For Crisper Edges): Lightly butter a non-stick skillet over medium-low heat. Place a single layer of blini in the pan and heat for 1-2 minutes per side, until warmed and slightly crispy at the edges. This method is great for achieving a fresh-from-the-pan texture.
Once reheated, blini are ready to be served with your favorite toppings, just as good as when they were freshly made!
Pro Tips for Flawless Russian Blini Every Time
Achieving perfectly golden and tender blini consistently can be an art, but with these expert tips, you’ll master the technique and avoid common pitfalls:
- Master the Heat: Always start cooking your blini on medium heat. This allows for gradual cooking and prevents immediate burning. Pay close attention and adjust the heat as needed. If the heat is too high, the blini will cook too quickly around the edges, becoming crisp or even burnt before the center has a chance to set. Conversely, if the heat is too low, the blini will take too long to cook, increasing their propensity to stick to the pan and possibly resulting in a tougher texture. The ideal medium heat creates a gentle sizzle and allows the blini to cook through evenly.
- Visual Cues for Flipping: When you first pour the blini batter into the hot skillet, it will appear wet and glossy. As it cooks, you’ll observe crucial changes: the edges will gradually set, becoming opaque and slightly golden, often with a delicate lacy pattern. Simultaneously, small bubbles will begin to form in the middle of the blini, and the entire surface will start to lose its wet sheen, appearing dry and matte. These are your unmistakable signals! When no visible liquid batter remains on top, it’s the perfect moment to flip. Flipping too early is a common mistake that will cause the delicate blini to break apart.
- The Art of the Flip: Flipping a thin blini without tearing it requires a gentle but swift touch. First, use your flexible rubber turner to carefully loosen the entire circumference of the blini from the pan. Once the edges are free, lift one edge slightly with your fingertip (if it’s cool enough) or use the turner to gently lift it. Then, slide the turner completely underneath the blini, gliding it towards the center. In one smooth, confident, swift motion, flip the blini over. With practice, this movement will become second nature, ensuring your blini remain intact and beautiful.
- Resting the Batter: After mixing, allow the blini batter to rest for 10-15 minutes at room temperature. This resting period allows the flour to fully hydrate, resulting in a more tender blini and a smoother batter that is easier to work with.
- The “Sacrifice” Blini: Don’t be disheartened if your very first blini doesn’t turn out perfectly. It’s often referred to as the “sacrifice” blini because it helps you assess and adjust your pan temperature and batter consistency. It’s a crucial test run!
Frequently Asked Questions About Blini (Blinchiki)
What’s the difference between blini and standard pancakes?
The primary differences between blini and standard American pancakes lie in their ingredients, leavening, and resulting texture. Traditional Russian blini, especially those made with yeast (though this recipe uses baking soda), are typically thinner, often 2-4 inches wide, and made with wheat or buckwheat flour. Yeast gives them a slightly savory, delicate, and porous texture. When made without yeast, as in this recipe, they achieve their lightness through eggs and soured milk (or milk with baking soda), resulting in an incredibly soft, delicate texture. Standard pancakes, however, are made with all-purpose flour and baking powder, which gives them their characteristic thick, fluffy, and cake-like consistency. Blini are far more pliable, making them ideal for rolling or folding around fillings, whereas pancakes are usually served in stacks.
What is the difference between Russian blini and French crepes?
While Russian blini and French crepes are often compared due to their thin, round form, there are subtle but important distinctions. Traditional Russian blini are thin, pan-sized pancakes made from an unleavened or lightly leavened batter, similar to crepes. However, crepes are typically made even thinner and often larger in diameter, designed to be almost paper-thin. Blini can sometimes be slightly thicker and more tender, and historically, yeasted blini offer a more complex, slightly tangy flavor due to fermentation. Both versions are incredibly versatile and delicious, but crepes tend to be more uniform in thickness and usually very light, while blini can encompass a wider range of textures from very thin to slightly fluffy, depending on the specific recipe and regional variations.
Can I make blini batter ahead of time?
Yes, you can absolutely prepare the blini batter in advance! In fact, letting the batter rest in the refrigerator for 30 minutes to an hour (or even overnight) can improve the texture of the blini, allowing the flour to fully hydrate. Just ensure it’s covered tightly to prevent a skin from forming. When ready to cook, give the batter a gentle whisk to recombine any separated ingredients, and if it’s too thick, you can thin it out with a tablespoon or two of milk until it reaches the desired consistency.
Can blini be frozen?
Blini freeze beautifully! To freeze, allow them to cool completely. Stack them with small sheets of parchment paper between each blini. Wrap the stack tightly in plastic wrap, then place them in a freezer-safe bag or airtight container. They can be stored in the freezer for up to 2-3 months. To reheat from frozen, you can warm them in a preheated 325°F (160°C) oven, covered with foil, for about 15-20 minutes, or gently in the microwave until soft and warm.
Explore More Delicious Pancake and Crepe Recipes!
If you’ve had the pleasure of trying this Blini Recipe, please share your experience! Leave a star rating and let us know your thoughts in the comments below. Your feedback inspires us!
Print Recipe

Classic Russian Blini Recipe (Sweetened)
- Author: Katya
- Prep Time: 15 mins
- Cook Time: 45 mins
- Total Time: 1 hour
- Yield: 6 servings (approx. 14 blini)
- Category: Breakfast, Dessert
- Method: Stovetop
- Cuisine: Russian
Description
Experience the authentic taste of Russia with these thin, pan-sized blini. Made from a simple, unleavened batter, they offer a delicate texture similar to crepes but with their own unique charm. Perfect for sweet or savory toppings!
Ingredients
- 2 large eggs
- 2 ½ cups whole or 2% milk, microwaved for 1 minute (lukewarm)
- 1 Tbsp. cane sugar or honey
- ¼ tsp. kosher salt
- ½ tsp. baking soda
- 1 Tbsp. light olive oil or refined coconut oil
- 2 Tbsp. butter, melted
- 1 cup all-purpose flour
- 1 tsp. vanilla extract
- Non-stick cooking spray
Tools
- Crepe pan or 10-inch non-stick skillet
- Ultra-thin rubber turner
Instructions
- In a large mixing bowl, whisk the eggs until smooth, then add the lukewarm milk and whisk to combine.
- Stir in the sugar, salt, baking soda, light olive oil, and melted butter. Whisk thoroughly until all ingredients are well incorporated.
- Gradually whisk in the all-purpose flour, adding it slowly to prevent lumps. Continue whisking until the batter is perfectly smooth. Finally, add the vanilla extract. The batter should be thick and heavy, resembling heavy cream.
- Heat a crepe pan or a 10-inch non-stick pan over medium heat. Lightly coat the pan with non-stick spray. Pour ¼ cup of batter into the center of the pan and quickly swirl the pan to spread the batter thinly and evenly.
- Cook for about 30 seconds, or until the edges are golden and lacy, and the top appears dry with no liquid batter. Gently flip the blini using a flexible rubber turner and cook for another 20 seconds, or until just set. Remove to a platter and continue with the remaining batter, reapplying non-stick spray as needed. If blini brown too quickly, reduce the heat. Don’t worry if the first one isn’t perfect; it often takes one to adjust the pan temperature. You should make approximately 14 blini.
Notes
- Choosing the Right Oil: For the best flavor profile, use a neutral-tasting oil such as light olive oil (ensure it’s not extra-virgin, which has a stronger taste) or refined coconut oil. Refined coconut oil is excellent because it has no distinct coconut taste or aroma, unlike virgin or unrefined coconut oil.
- Storing Leftovers: Any leftover blini without toppings can be stored in the refrigerator for 2-3 days. For best results, place parchment paper between each blini when stacking them in an airtight container or wrapped in plastic. You can enjoy them chilled, at room temperature, or gently warmed. For larger quantities, reheating in a low-temperature oven is an excellent way to warm them evenly without drying them out.
Nutrition
- Serving Size: 2-3 blini
- Calories: 225
- Sugar: 7.3 g
- Sodium: 224.9 mg
- Fat: 11.3 g
- Carbohydrates: 23 g
- Protein: 7.5 g
- Cholesterol: 82.3 mg