
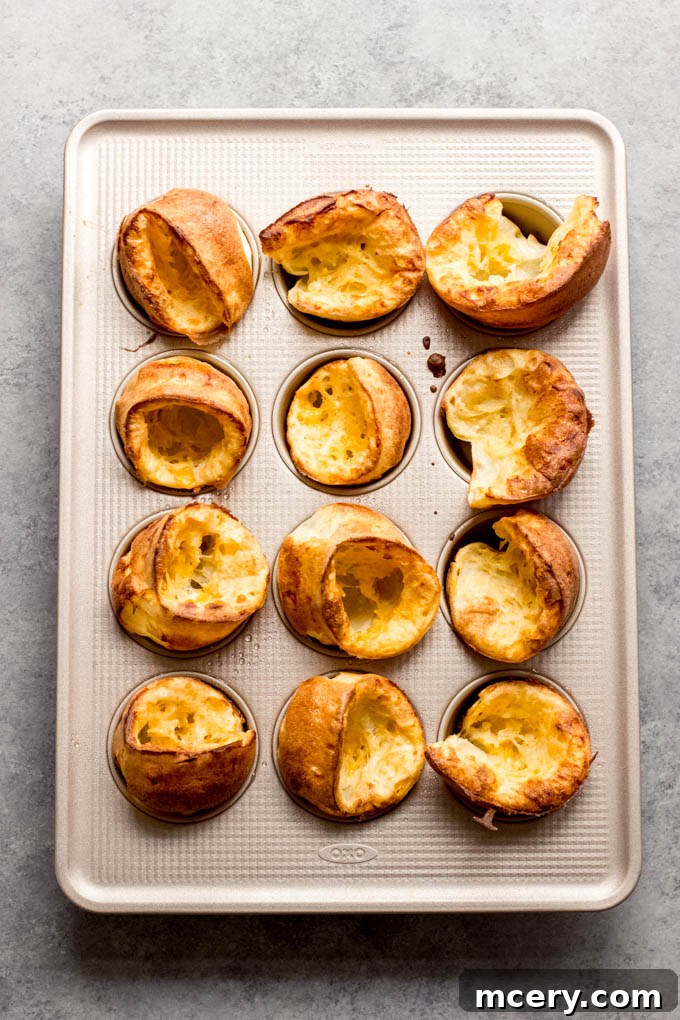
Prepare to be amazed by the most incredibly airy and crispy cheese popovers you could ever imagine. Forget about specialized bakeware – no popover pan is even required for these delightful treats! Get ready to elevate your meal experience with these easy-to-make, utterly delicious, and surprisingly versatile additions to your culinary repertoire. Whether you’re a seasoned baker or a kitchen novice, this recipe promises golden, puffed perfection every time.
These savory popovers are incredibly versatile, making them a fantastic companion for a variety of dishes. Dunk them into our hearty homemade beef stew for a comforting meal, serve them alongside crisp salads for a touch of elegance, or dip them into a rich cheddar cranberry dip for an irresistible appetizer. Their light texture and cheesy flavor make them a welcome addition to any table, from casual family dinners to more sophisticated gatherings.
What Exactly Are Popovers?
Cheese popovers are a unique type of roll, characterized by their hollow, eggy, muffin-sized form. Their name comes from their distinctive baking process, where they dramatically “pop over” the sides of the pan, forming tall, dramatic crowns. This magical rise creates a stunning visual, but the real treat is in their texture: a wonderfully crispy outside gives way to an airy yet slightly custardy, melt-in-your-mouth interior. They offer a delightful contrast of textures that makes them incredibly addictive and distinct from traditional bread rolls or muffins.
These delightful baked goods are incredibly easy to make, relying on mostly common pantry ingredients and a standard muffin pan – no fancy equipment required! Much like our popular jalapeno cheddar biscuit recipe, these popovers demonstrate that impressive baking can be achieved with minimal fuss. Their simplicity makes them perfect for a quick weeknight side or a special weekend brunch treat. The addition of sharp cheddar cheese infuses them with a savory depth that appeals to all palates, making them far more exciting than plain bread.
Enjoy these crispy cheese popovers as-is for a simple, satisfying snack, perhaps with a generous smear of butter or your favorite jam for a sweet and savory contrast. For a more complete meal, they are an excellent accompaniment to a variety of hearty dishes, soaking up rich broths and sauces beautifully. Pair them with a comforting roasted tomato basil soup, a robust turkey chili with beans, or a creamy summer corn chowder. Their light texture ensures they complement, rather than overpower, your main course, making every bite a delight.
Unlocking the Secrets to Perfect Popovers Every Time
Achieving those perfectly puffed, golden popovers isn’t as mysterious as it seems. There are two fundamental secrets to ensure your popovers rise flawlessly and emerge with that coveted crispy exterior and tender interior. Mastering these simple techniques will transform your baking experience and guarantee consistent success with every batch.
First and foremost, the key to a magnificent rise lies in starting with a piping hot pan. Before introducing any batter, preheat your muffin pan in the oven to a high temperature. This initial burst of heat is critical because it immediately creates steam from the moisture in the batter, which is what causes the popovers to expand rapidly and dramatically. By beginning to cook instantly, the batter’s exterior sets quickly, trapping the steam inside and pushing the popovers upwards, forming their signature tall crowns. A cold pan will result in a slower rise and a denser, less airy final product.
The second, equally vital secret for success is to resist the temptation to open the oven door while the popovers are baking. This is perhaps the most crucial rule for preventing deflation. Opening the oven door, even for a brief moment, causes a rapid drop in temperature inside the oven. This sudden change can cause the delicate structure of the rising popovers to collapse before it has fully set, resulting in sad, sunken, and dense popovers instead of their intended fluffy, hollow form. Patience is a virtue when baking popovers; trust the process and keep that oven door firmly shut until they are beautifully golden brown and fully puffed.
Cheese Popovers: Your Frequently Asked Questions Answered
Before we dive into the step-by-step instructions for making these incredible cheese popovers, let’s address some of the most common questions people have. Understanding these nuances will help ensure your baking experience is smooth and successful. If your question isn’t covered here, feel free to ask in the comments below!
Do you need a special popover pan to make popovers?
Absolutely not! While traditional popover pans exist and can be fun to use, they are far from a necessity. For this recipe, a standard 12-cup muffin pan works perfectly. The key is to ensure each cup is thoroughly greased and preheated to encourage that characteristic “pop over” effect. The depth of a muffin tin is sufficient to achieve impressive height and an airy interior.
What is the ideal consistency of popover batter?
The consistency of popover batter is quite distinctive and crucial for success. It should be noticeably runny, very similar to the texture of heavy cream or thin pancake batter. Don’t be alarmed if it seems too liquidy – this fluid consistency allows the batter to climb rapidly up the hot pan, creating those beautiful, tall, hollow centers. A thick batter will yield dense, muffin-like results instead of true popovers.
Should popover batter rest before baking?
For many traditional recipes, resting the batter is recommended to allow the flour to fully hydrate and gluten to relax. However, for these cheese popovers, we find it’s not strictly necessary. They rise just fine without any resting period, making this recipe even quicker and more convenient. You can mix the batter and pour it straight into the hot pan.
Can I prepare popover batter in advance?
Yes, you can certainly prepare the popover batter earlier in the day if you wish to get a head start. Simply mix the batter, cover it, and refrigerate. When you’re ready to bake, remove the batter from the fridge and let it stand at room temperature for about 30 minutes while you preheat your oven and muffin pan. Give the batter a good stir just before pouring it into the cups to ensure everything is well combined.
How do you know when popovers are fully cooked?
Popovers are done when they have risen impressively high, turned a beautiful golden brown color, and look distinctly crusty on the outside. To confirm their doneness, they should feel dry and firm to the touch, and when gently tapped, they should sound hollow. This indicates that the interior has fully cooked and set, preventing them from collapsing once removed from the oven. Undercooked popovers will be pale and may deflate.
Why are my popovers not rising or fluffy?
There could be a few reasons why your popovers aren’t achieving that desired fluffy, airy texture. First, always stick to the recipe as written, especially for baking, as ingredient ratios are crucial. Any substitutions might affect the outcome. Second, and this is critical, do not open the oven door while the popovers are baking; a temperature drop will cause them to deflate. Lastly, ensure your pan is truly piping hot before pouring in the batter. This initial heat is what jumpstarts their rise and creates that steam-driven puff. Accurate oven temperature is also key, so consider an oven thermometer.
What does a popover taste like?
A perfectly baked popover offers a delightful symphony of textures and flavors. On the outside, it’s wonderfully crispy and golden, sometimes with a slight chew. The inside is airy, soft, and somewhat custardy, with a rich, buttery, and slightly eggy flavor. When made with cheese, like our recipe, you get a savory, umami note that perfectly complements the light texture. They are often compared to a Dutch baby pancake or even a savory English Yorkshire pudding, sharing that puffed, eggy character.
Are popovers good the next day?
Popovers, at their absolute best, are meant to be enjoyed immediately after baking. That’s when their exterior is at its crispiest and their interior is most airy and tender. As they sit, they tend to lose some of their characteristic crispiness and can become softer. However, if you have leftovers, they can be gently reheated in a warm oven (around 350°F or 175°C) for a few minutes to crisp them up again, though they may not regain their original glory.
Essential Ingredients for Irresistible Cheese Popovers
Crafting these delectable cheese popovers requires only a handful of staple ingredients, proving that extraordinary results can come from simple components. Each ingredient plays a vital role in achieving that perfect airy texture and rich flavor profile:
- Whole Eggs and Egg White: A combination of whole eggs and an extra egg white provides the essential structure and leavening power for the popovers to rise dramatically. The eggs are crucial for their custardy interior.
- Milk: Whole milk is preferred for its richness, but any milk will work. The liquid content creates steam, which is fundamental to the popover’s signature puff.
- Unsalted Butter: Melted butter adds a beautiful richness and flavor to the popovers. Using unsalted butter allows you to control the overall saltiness of the dish.
- All-Purpose Flour: Standard all-purpose flour provides the necessary gluten structure. It’s important to measure it correctly (spooned and leveled) to avoid a dense batter.
- Kosher Salt: A touch of kosher salt enhances all the flavors, balancing the richness of the cheese and butter.
- Cheddar Cheese: Shredded sharp cheddar cheese is the star flavor, infusing each popover with a savory, tangy note. Shredding your own from a block is highly recommended for superior flavor and melt.
- Cooking Spray: Essential for generously coating the hot muffin pan, ensuring the popovers don’t stick and release easily after baking.
Step-by-Step Guide: How to Bake Perfect Cheese Popovers
Making these cheese popovers is a straightforward process that yields impressive results. Follow these simple steps for golden, puffed perfection:
Step 1: Prepare Your Oven and Pan
Begin by placing a 12-cup standard muffin pan directly into your oven. Preheat the oven to 400 degrees F (200 degrees C). Allowing the pan to preheat ensures it’s piping hot when the batter is added, which is absolutely crucial for the popovers to rise properly and develop a crispy crust. Don’t skip this critical step!
Step 2: Create the Silky Smooth Batter
In a large mixing bowl, vigorously whisk together the whole eggs and the extra egg white until they are well combined and slightly frothy. Next, pour in the milk and the melted unsalted butter, whisking until fully incorporated. Gradually add the all-purpose flour and kosher salt, whisking continuously until the batter is smooth. Be careful not to overmix; a few small lumps are acceptable. Finally, fold in the shredded cheddar cheese. The finished batter should be quite runny, akin to the consistency of heavy cream.
Step 3: Fill the Hot Muffin Pan Swiftly
Carefully remove the heated muffin pan from the oven using oven mitts. Immediately and generously spray the inside of each cup with nonstick cooking spray, making sure to coat the bottom, sides, and even the rim of each cup. Working quickly to retain the heat, fill each cup about halfway full with the prepared popover batter. Speed is key here to maintain the pan’s heat.
Step 4: Bake to Golden Perfection
Without delay, place the filled muffin pan back into the oven, ideally on the lowest oven rack. Bake the popovers for approximately 20-25 minutes, or until they are dramatically risen, deeply golden brown, and delightfully crusty. This is the most crucial part of the process: do not open the oven door during baking! A sudden drop in temperature will cause your beautiful popovers to deflate and lose their iconic structure.
Step 5: Release the Steam and Serve Immediately
Once baked, carefully remove the popovers from the oven and transfer them to a cooling rack or a serving platter. If any popovers seem stuck, gently run a thin knife around the edge of the cup to loosen them before removal. To prevent them from becoming soggy and to maintain their crispiness, immediately pierce each popover with the tip of a sharp knife. This allows the trapped steam inside to escape. Serve your incredibly airy and crispy cheese popovers immediately to enjoy them at their peak of perfection!
Expert Tips for Popover Perfection
To ensure your cheese popovers consistently turn out light, airy, and beautifully puffed, keep these essential tips in mind. They are the keys to avoiding common pitfalls and achieving professional-level results in your home kitchen:
- Measure Flour Accurately: Always spoon and level your flour rather than scooping directly from the bag. Scooping packs the flour, leading to too much flour, which can result in a dense, heavy batter and under-risen popovers.
- Generously Grease the Pan: After preheating, liberally spray your muffin pan with non-stick cooking spray. Ensure you coat the inside of each cup, including the bottom, sides, and especially the rim. This prevents sticking and guarantees easy release of your perfectly puffed popovers.
- Shred Your Own Cheese: For the best flavor and melt, buy a block of sharp cheddar cheese and shred it yourself. Pre-shredded cheeses often contain anti-caking agents that can hinder smooth melting and slightly alter the texture and flavor.
- Use the Lowest Oven Rack: Baking the popovers on the lowest oven rack exposes them to direct heat from below, encouraging maximum rise and helping to create that wonderfully crisp bottom crust.
- Patience is Key: Do Not Open the Oven Door! This cannot be stressed enough. Opening the oven door at any point during baking will cause a sudden temperature drop, leading to deflated popovers. Trust the process and keep the oven door closed until the recommended baking time is complete and they are golden and firm.
- Serve Immediately: Popovers are best enjoyed fresh out of the oven when their exterior is at its crispiest and their interior is most tender and steamy. They will lose their crispiness as they cool.
Delicious Serving Suggestions for Your Cheese Popovers
These cheddar cheese popovers are wonderfully light and airy, making them incredibly versatile for various meals. While they are delightful enjoyed on their own as a savory snack, their neutral yet cheesy flavor pairs beautifully with a wide array of soups, stews, and salads. Here are a few suggestions to inspire your next meal:
- Hearty Soups and Stews: Their hollow, airy structure makes them perfect for soaking up rich broths and gravies. They are an ideal companion for Tuscan White Bean and Kale Soup, a comforting Potato Corn Chowder, or a flavorful Sicilian Chicken Soup.
- Fresh Salads: Serve them alongside a crisp and vibrant salad for a satisfying lunch or light dinner. They would be excellent with a Chopped Autumn Salad, a refreshing Shrimp Salad, or an earthy Roasted Beet Salad. The savory popovers add a nice textural contrast and a hint of warmth to cool greens.
- Breakfast or Brunch: Don’t limit popovers to just dinner! Serve them hot with scrambled eggs, bacon, or a fresh fruit salad for an elevated breakfast or brunch experience.
- As a Side for Roasts: Similar to Yorkshire pudding, popovers are a fantastic side for roasted meats, like roast beef or chicken, perfect for soaking up pan juices.
- With Dips and Spreads: Offer them with a variety of dips, from creamy hummus to a rich spinach dip, for a delightful appetizer spread.
Love popover-type recipes and looking for more unique baked goods? Don’t miss our authentic Brazilian cheese bread (Pão de Queijo) for another cheesy, airy delight, or indulge in our sweet and fluffy strawberry-filled pancakes for a comforting breakfast treat.
Print Recipe
Cheese Popovers
5 out of 5 stars based on 1 review
- Author: Katya
- Prep Time: 10 min
- Cook Time: 25 min
- Total Time: 35 minutes
- Yield: 12 popovers
- Category: Bread
- Method: Baked
- Cuisine: American
Description
Most incredibly airy and crispy cheese popovers you could ever imagine. No popover pan is even required!
Ingredients
Units
Scale
- 2 large eggs
- 1 large egg white
- 1 cup milk
- 1 Tbsp. unsalted butter, melted
- 1 cup all-purpose flour, spoon & leveled
- ½ tsp. kosher salt
- ½ cup shredded sharp cheddar
- Cooking spray
Tools
- 12-cup muffin pan
Instructions
-
Place a 12-cup muffin pan in the oven and preheat to 400 degrees F.
-
In a large bowl, whisk together the eggs and egg white. Add milk and butter. Then whisk in flour and salt. Lastly, add the cheddar cheese. The batter should be runny, similar to the consistency of heavy cream.
-
Remove the heated muffin pan from the oven. Generously spray the inside of each cup with nonstick cooking spray, including the rim. Working quickly, fill each cup about half full with the batter.
-
Immediately, place the pan on the lowest oven rack and bake until brown and crusty, about 20-25 minutes. Do not open the oven door during baking as this causes the popovers to deflate.
-
Remove the popovers onto a cooling rack or platter. If popovers get stuck to the pan, run a knife around the edge, then remove. Pierce each popover with a sharp knife to release steam. Serve immediately.
Notes
- Before making the popovers, I highly recommend checking out the Q&A section of the post. I covered most commonly asked questions and included many tips for success.
Nutrition
- Serving Size: 1 popover
- Calories: 91
- Sugar: 1.1 g
- Sodium: 107.9 mg
- Fat: 4.1 g
- Carbohydrates: 9.1 g
- Protein: 4.1 g
- Cholesterol: 40.2 mg