
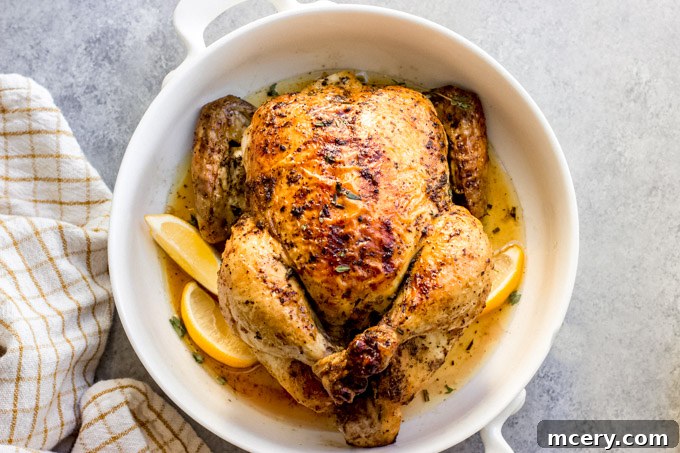
The Easiest Herb-Roasted Whole Chicken Recipe for Unforgettable Flavor
If you’ve searched for the ultimate roasted chicken recipe that consistently delivers mouthwatering results with minimal fuss, your quest ends here. Throughout my culinary journey, I’ve experimented with countless approaches to roasting a whole chicken, but this particular recipe consistently stands out as the absolute easiest and most delicious. Its simplicity makes it a staple in my kitchen, a dish I return to again and again because it promises succulent, flavorful meat and perfectly crispy skin every single time, without the stress typically associated with preparing a whole bird.
For those who love versatile chicken dishes, don’t miss our equally delightful roasted chicken thighs, another fantastic recipe to add to your repertoire.
Why This Is Your Go-To Roasted Chicken Recipe
What truly sets this herb-roasted chicken apart is its brilliant make-ahead strategy. The core of this recipe involves a simple yet highly effective overnight preparation, which means the heavy lifting is done well in advance. This leaves you with ample time on the day of cooking to focus on preparing delectable side dishes, like savory homemade steak fries or rich homemade garlic mashed potatoes, without feeling rushed. Imagine hosting a dinner party or enjoying a cozy Sunday meal with minimal stress!
Beyond its effortless preparation, this whole roasted chicken offers incredible versatility. While it might not be a traditional holiday centerpiece like ham or turkey for everyone, its exquisite flavor and tender texture consistently earn rave reviews from all my guests, who inevitably ask for the recipe. It pairs beautifully with our green bean casserole from scratch, creating a truly memorable and satisfying meal. I’m excited to share all my insider tips and tricks, ensuring you achieve that coveted crispy skin and moist, tender meat every time, all with remarkably minimal effort.
The Secret to Effortless Flavor: This recipe’s incredible ease comes from dousing the chicken in a vibrant lemon and fresh herb mixture the night before. This allows the flavors to deeply infuse into the meat. The next day, it roasts in the very same pan, yielding the most tender and flavorful chicken imaginable.
The Secret to Unbelievably Tender & Flavorful Roast Chicken: Advanced Salting
The true key to unlocking an exceptionally tasty and juicy whole roasted chicken lies in a technique often overlooked: salting the chicken thoroughly and ahead of time. This isn’t just about a light sprinkle of salt right before roasting; it’s a deliberate and generous seasoning of every single surface of the meat. Think beyond the visible exterior: ensure you season the skin along the backbone, delve deep inside the cavity, and carefully season under the wings. This comprehensive salting process is what elevates the chicken from good to extraordinary.
For optimal results, this crucial salting step should be performed at least 12 to 24 hours before you plan to roast the chicken. Before you begin, ensure your chicken is completely thawed and ready for seasoning. This extended contact with salt triggers a fascinating scientific process. Initially, the salt draws moisture out of the chicken meat through osmosis. However, over time, the chicken then reabsorbs much of that moisture, along with the dissolved salt and other seasonings. This reabsorption not only tenderizes the meat at a cellular level but also ensures that the flavor penetrates much deeper than surface-level seasoning could ever achieve, resulting in an incredibly moist and flavorful bird.
Essential Ingredients for Your Perfect Herb-Roasted Chicken
The beauty of this herb-roasted chicken recipe lies in its simple yet powerful combination of fresh, vibrant ingredients that come together to create an unforgettable flavor profile. Here’s what you’ll need to prepare this show-stopping dish:
- Whole Chicken: Choose a high-quality bird, ideally around 4-5 pounds, for best results and even cooking.
- Olive Oil: Extra virgin olive oil adds richness and helps crisp the skin while carrying the herb flavors.
- Lemon Juice and Zest: Fresh lemon is crucial; the juice tenderizes and brightens, while the zest provides aromatic oils for a deeper citrusy note.
- Fresh Rosemary: Its pungent, piney aroma is a classic pairing with chicken, offering a robust herbaceous flavor.
- Fresh Thyme: Earthy and slightly minty, fresh thyme complements the rosemary beautifully, adding depth.
- Fresh Parsley: Bright and fresh, parsley adds a pop of green and a clean, peppery undertone that lifts the other flavors.
- Garlic Powder: Unlike fresh garlic, garlic powder infuses flavor without the risk of burning at high roasting temperatures.
- Kosher Salt: Essential for the overnight brining effect that guarantees a juicy and well-seasoned chicken. Remember, proper salting is key!
- Black Pepper: Freshly ground black pepper adds a subtle spice and aromatic kick.
These ingredients, particularly the fresh herbs and lemon, work in harmony during the overnight marinade to create a truly aromatic and deeply flavored chicken.
Elevate Your Roast: Best Seasonings for Custom Flavor
While our core herb blend is a timeless favorite, the beauty of a roast chicken recipe lies in its adaptability. The best roast chicken uses a combination of herbs and spices to truly elevate the meat’s natural flavors. You can easily customize this recipe to suit your preferences, holiday traditions, or what you have on hand. Feel free to mix and match these ingredients to craft your signature spice blend, transforming your meal from simply delicious to uniquely yours.
Consider these additions to broaden your flavor horizons:
- Additional Herbs: For a different aromatic profile, try marjoram for a woodsy, slightly sweet note; tarragon for its distinct licorice-like essence; fresh cilantro for a bright, citrusy finish (though use sparingly if roasting); or sage for an earthy, savory depth, especially fitting for autumn meals.
- Flavorful Spices: Dive into your spice rack! Dried basil offers a sweet, peppery touch; onion powder complements garlic for a richer allium flavor; curry powder can introduce warmth and exotic notes; chili powder or cayenne pepper will add a subtle or fiery kick; paprika provides a smoky or sweet red pepper flavor and a beautiful color; ginger offers a pungent, zesty heat; cumin brings an earthy, savory depth; and a pinch of nutmeg can add a surprising warmth and complexity.
Experimenting with these seasonings allows you to create endless variations, making this recipe a truly versatile canvas for your culinary creativity.
Pro Tips for a Foolproof Oven-Roasted Whole Chicken
Before you embark on your journey to the perfect herb-roasted chicken, take a moment to review these expert tips. Following these guidelines will ensure a foolproof cooking experience and guarantee delicious, restaurant-quality results every single time:
- Opt for Garlic Powder, Not Fresh: It might be tempting to use fresh garlic for its robust flavor, but in high-heat roasting scenarios, fresh garlic tends to burn easily, imparting a bitter taste. Garlic powder, on the other hand, provides all the desired aromatic notes without the risk of scorching.
- Prioritize Fresh Herbs: While dried herbs can be convenient, for this recipe, fresh herbs are truly non-negotiable. They contribute a vibrant, aromatic depth and a fresher flavor that dried alternatives simply cannot replicate. Their oils release beautifully during the overnight marinade and roasting process.
- Salting is Paramount: As highlighted earlier, thorough salting is the secret weapon for this recipe. Do not rush this step. Take your time to generously season every inch of the chicken – inside the cavity, under the wings, along the backbone, and over all skin surfaces. This extensive seasoning is not just for flavor; it’s fundamental to achieving incredibly tender, juicy meat.
- Employ Aluminum Foil for Browning Control: Keep an eye on your chicken’s skin as it roasts. If you notice it’s browning too quickly or excessively, especially towards the end of the cooking time, loosely tent the chicken with aluminum foil. This will prevent burning while allowing the internal meat to finish cooking to perfection.
- Choose the Right Roasting Pan: The size of your roasting pan makes a significant difference. You want a pan that allows some room for air circulation around the chicken but isn’t so large that the pan juices evaporate too quickly. Conversely, avoid overcrowding the chicken in a small pan, which can steam rather than roast. A standard 9×13 inch baking dish is ideal for a typical 4-pound chicken.
- Crucial Resting Period: Patience is key post-roasting. Once the chicken is out of the oven, resist the urge to carve it immediately. Allow it to rest, loosely covered with foil, for 10-15 minutes. This resting period is vital as it allows the juices to redistribute throughout the meat, resulting in a significantly more tender and moist chicken.
Step-by-Step Guide: How to Make This Easy Roasted Chicken
Preparing this easy roasted chicken is a straightforward process, largely thanks to the overnight marination. Here’s a quick summary of how to achieve this incredible dish, broken down into simple, actionable steps:
1. Prepare the Herb-Lemon Mixture: In a small bowl, combine the olive oil, fresh lemon juice, lemon zest, minced fresh rosemary, minced fresh thyme, minced fresh parsley, and garlic powder. Whisk these ingredients together thoroughly until well combined. This aromatic mixture is the heart of your chicken’s flavor profile.
2. Season the Chicken and Marinate: Start by patting the entire chicken dry with paper towels, both inside and out. This is crucial for crispy skin. Place the dried chicken breast-side up in your chosen roasting pan or baking dish. Pour the prepared herb and oil mixture generously over the chicken, making sure to spread it evenly across all surfaces, including inside the cavity. Then, liberally season the chicken all over with kosher salt and black pepper, ensuring every inch is well-covered.
3. Overnight Refrigeration: Once seasoned, cover the baking dish tightly with aluminum foil. This prevents air exposure and helps the flavors meld. Transfer the covered chicken to the refrigerator and allow it to marinate overnight (for at least 12 hours, and up to 24 hours). This extended marination is where the magic happens, infusing the chicken with incredible flavor and ensuring tenderness.
4. Prepare for Roasting: The next day, when you’re ready to cook, preheat your oven to 425°F (220°C). Remove the chicken from the refrigerator and uncover the dish. To ensure even cooking and a neat presentation, use kitchen string to tie the legs together. Tuck the wing tips underneath the body of the chicken; this prevents them from burning and keeps the chicken compact. Make sure the chicken is positioned breast-side up in the pan. Allow it to sit at room temperature while the oven preheats, which helps it cook more evenly.
5. Roast and Rest: Place the chicken in the preheated oven, breast-side up. Roast for approximately 1 hour. Halfway through the cooking time, you can baste the chicken with any accumulated pan juices to keep it moist and enhance browning. The chicken is fully cooked when the internal temperature reaches 165°F (74°C) in the thickest part of the thigh, and when the juices run clear if you make a small cut between a leg and a thigh. Once cooked, remove the chicken from the oven and loosely cover it with aluminum foil. Let it rest for 10-15 minutes before carving and serving. This resting period is crucial for juicy meat.
Achieving That Irresistibly Crispy Chicken Skin
The quest for crispy, golden-brown chicken skin without drying out the succulent meat is a culinary art. The key lies in a strategic cooking approach: slowly cooking the interior of the chicken to perfection, then finishing with a technique that crisps the exterior. Here’s how to master it:
- Start Dry: Begin by thoroughly patting the entire exterior of the chicken dry with paper towels. Excess moisture on the skin will steam rather than crisp, so this step is non-negotiable for that crackling texture.
- Apply Fat Liberally: Once dry, generously spread a thin layer of fat over the chicken skin. Olive oil (as used in this recipe) or melted butter works wonders. This fat conducts heat, promoting browning and crisping.
- High Heat Roasting: Roasting at a higher temperature, like the 425°F (220°C) recommended in this recipe, helps achieve crispy skin quickly. The intense heat draws out moisture from the skin’s surface, turning it golden and brittle.
- Monitor Browning & Use Foil: Keep a close eye on the chicken. If the skin begins to darken too rapidly before the internal meat is fully cooked, don’t panic. Simply loosely tent the chicken with aluminum foil. This acts as a shield, slowing down the browning process while allowing the meat to finish cooking evenly.
- Consider Broiling (Optional Finish): If you like to baste your chicken frequently with its accumulated juices (which can sometimes soften the skin slightly), or if you find your skin isn’t quite as crispy as you’d like at the end of the roast, a brief broil can be your best friend. After the chicken is fully cooked and has rested, place it back in the oven under the broiler for 2-5 minutes, watching it constantly to prevent burning. This quick burst of intense heat will give you that perfect, golden-brown crispness right before serving.
Ensuring Perfect Doneness: Checking Your Roast Chicken’s Temperature
Ensuring your whole roasted chicken is cooked to the correct internal temperature is not just about achieving optimal taste and texture; it’s a critical food safety measure to eliminate harmful bacteria. Relying solely on visual cues can be misleading, so an instant-read thermometer is your most valuable tool. Here’s how to use it effectively:
- Where to Insert the Thermometer: The most accurate reading comes from the thickest part of the chicken’s thigh. This area is typically the last to cook through, so if the thigh is done, the rest of the chicken should be as well. Insert the thermometer probe into the thickest part of the thigh, making sure it doesn’t touch any bone, as bones heat up faster and can give a false reading.
- The Target Temperature: The universally recommended safe internal temperature for cooked poultry, including whole chicken, is 165°F (74°C). This temperature has been scientifically determined to be optimal for killing any potential bacteria, ensuring your meal is safe to consume.
- Check Multiple Spots (If Unsure): For larger birds or if you’re new to roasting, it’s wise to check the temperature in a couple of different spots in the thigh, and even in the thickest part of the breast, just to be certain.
The Power of Resting: After achieving the perfect internal temperature, it’s absolutely crucial to allow the chicken to rest. Transfer the cooked bird from the oven to a shallow roasting pan or a ridged cutting board (which catches any juices). Loosely tent it with aluminum foil and let it rest for 10 to 30 minutes, depending on its size. This resting period allows the muscle fibers to relax and the internal juices to redistribute evenly throughout the meat, resulting in a significantly juicier, more tender, and flavorful bird. Cutting into it too soon will cause those precious juices to run out, leaving you with dry meat.
Mastering the Carve: How to Cut a Whole Roast Chicken
Carving a whole roasted chicken might seem like a daunting task, but with a sharp knife and a little practice, it’s actually quite straightforward. A beautifully carved chicken not only makes for an impressive presentation but also ensures everyone gets a perfect piece. Here’s a simple guide:
- Allow it to Rest: As mentioned, always let the chicken rest for 10-15 minutes after roasting. This is non-negotiable for juicy meat.
- Detach the Legs and Thighs: Once the chicken has cooled enough to handle comfortably, place it on a sturdy cutting board. Using a large, sharp carving knife, gently pull one leg away from the body until you feel the joint pop. Slice through the skin and meat to separate the leg quarter (thigh and drumstick) from the breast. Repeat with the other leg. You can then separate the drumstick from the thigh by cutting through the joint.
- Remove the Breast Meat: To carve the breast, make a long cut along one side of the breastbone, from the top of the breast down towards the cavity. Then, slice horizontally at the top of the breast, towards the wing joint, and gently slide your knife along the rib cage, following the natural curve of the bone, to detach the entire breast half. Repeat on the other side. You can then slice the breast meat against the grain into desired portions.
- Consider the Wings: The wings can either be served as is, if desired, or carefully detached and saved for making flavorful chicken stock later.
- Utilize the Juices and Bones: Once you’ve removed all the desired meat from the body, don’t discard the pan drippings or the carcass! Pour any remaining juices over the carved chicken meat for added flavor and moisture, or use them as a base for a quick pan sauce or gravy. Save the bones and carcass in a large freezer bag for up to three months to make a rich and nourishing homemade chicken broth.
Serving Suggestions: What to Pair with Your Oven-Roasted Chicken
The beauty of this simple whole roasted chicken is its incredible versatility. It’s the quintessential comfort food, perfect for a relaxed Sunday night dinner, yet elegant enough to be the star of a holiday meal. It pairs wonderfully with a wide array of sides, creating a truly satisfying culinary experience. For an ultimate comfort pairing, try serving it with our creamy whole wheat mac and cheese. Beyond that, here are some delicious side dishes that perfectly complement the rich flavors of a herb-roasted chicken:
- Creamy Red Skin Mashed Potatoes: A classic and comforting choice that soaks up all the delicious pan juices.
- Sweet & Savory Maple Roasted Brussel Sprouts: The slight bitterness of Brussels sprouts with the sweetness of maple offers a delightful contrast.
- Tender Roasted Garlic Green Beans: A simple, healthy, and flavorful green vegetable option.
- Decadent Garlic Parmesan Potatoes in Cream Sauce: For a richer, indulgent potato side that’s bursting with flavor.
- Fresh Brussels Sprouts Caesar Salad: A light and tangy salad to balance the richness of the chicken.
- Vibrant Roasted Beet Salad with Avocado: A colorful and nutritious option, offering earthy and creamy textures.
Whether you’re planning a casual family meal or an elaborate gathering, these side dishes will ensure your roasted chicken is accompanied by flavors and textures that delight every palate.
Creative Variations for Your Whole Roast Chicken
Once you’ve mastered the basic herb-roasted chicken, you’ll discover it’s a fantastic canvas for culinary creativity. Here are a couple of popular variations to enhance your meal, adding even more flavor and versatility.
Cooking Flavorful Vegetables Alongside Your Roast Chicken
One of the easiest ways to create a complete, one-pan meal is to roast vegetables alongside your chicken. Root vegetables are particularly well-suited for this, as they can withstand the longer cooking times and absorb the rich pan drippings, becoming incredibly flavorful and tender.
Preparation: Select hardy vegetables such as russet or red potatoes, carrots, sweet potatoes, butternut squash, acorn squash, or parsnips. Peel them if necessary, then cut them into roughly two-inch pieces to ensure even cooking. Larger pieces will take longer, while smaller ones might overcook.
Placement and Seasoning: About 30-45 minutes before the chicken is done (or from the start if using very hardy vegetables and smaller pieces), arrange the prepared vegetables around the chicken in the roasting pan. You can lightly toss them with a little olive oil, salt, and pepper, or let them absorb the seasonings and juices already in the pan. Feel free to add extra herbs or spices that complement your chicken, much like in our delicious roasted potatoes and carrots recipe. The vegetables will cook beautifully, infused with the savory flavors of the chicken drippings.
Recipe Variation: For a quicker roasting option that’s just as delicious, be sure to try our Roasted Half Chicken. It’s incredibly easy to prepare and cooks in less time!
The Art of Stuffing a Chicken (and Food Safety Tips)
Stuffing a chicken is a cherished tradition, particularly for holiday meals, serving the dual purpose of infusing the bird with additional flavor and creating a rich, savory side dish. You have two main approaches when it comes to stuffing your chicken: using it solely for flavoring the bird, or preparing stuffing that you intend to eat.
Stuffing for Flavor Only: If your primary goal is to impart aromatics and flavor into the chicken, you can simply fill the cavity with large chunks of onion, lemon halves, garlic cloves, or extra fresh herbs. These ingredients do not need to reach a specific internal temperature themselves, as they won’t be consumed. This method is simpler and carries fewer food safety concerns.
Stuffing for Consumption: If you plan on eating the stuffing, an extra step and careful attention to food safety are absolutely essential. As the chicken roasts, its juices will drip down into the stuffing within the cavity, infusing it with flavor but also exposing it to raw chicken juices. Therefore, the stuffing itself must reach a safe internal temperature to kill any potential bacteria.
Critical Food Safety: You’ll need to ensure both the chicken meat and the stuffing inside are fully cooked before serving. Use a reliable meat thermometer to check the temperature of both. The chicken should reach 165°F (74°C) in the thickest part of the thigh, and the stuffing, specifically, must also reach an internal temperature of 165°F (74°C) when measured in the center of the stuffing. Undercooked stuffing can pose a serious health risk, so always verify its temperature before enjoying.
Storing and Reheating Your Whole Roast Chicken Leftovers
One of the many joys of roasting a whole chicken is the delicious leftovers, which can be just as satisfying as the initial meal. Proper storage and reheating techniques are key to enjoying your chicken for days to come. This recipe is fantastic for meal prepping and repurposing!
Refrigerate: To maintain freshness and safety, allow any leftover chicken to cool completely before storing. Once cooled, shred or cut the chicken meat off the bones and transfer it to an airtight container. It will keep beautifully in the refrigerator for up to five days. Leftover roast chicken is particularly fantastic for transforming into a comforting bowl of lemon orzo chicken soup.
Reheat: There are several excellent ways to reheat your roasted chicken while keeping it moist. For quick reheating, you can warm it in the microwave in 30-second increments, stirring occasionally, until it’s heated through. Alternatively, for stovetop reheating, place the chicken pieces in a skillet with a splash of chicken broth or water over medium-low heat, covering the pan to create steam and prevent drying. You can also enjoy leftover chicken cold, especially when repurposed into a fresh chicken salad or added to sandwiches.
Freeze: Freezing is an excellent option if you want to save your roasted chicken for longer-term enjoyment. Cooked chicken thaws remarkably well, provided it’s properly protected from freezer burn. To do this, wrap individual portions or shredded chicken tightly in plastic wrap, then place them in a large, heavy-duty freezer bag or an airtight container. This method helps prevent air exposure and maintains quality. Frozen chicken will stay fresh for up to three months. To thaw, simply transfer it from the freezer to the refrigerator overnight, then reheat as desired.
Frequently Asked Questions About Oven-Roasted Whole Chicken
While you can roast or bake chicken anywhere between 325°F (160°C) and 450°F (230°C), for this specific herb-roasted chicken recipe, 425°F (220°C) is the ideal temperature. It’s the sweet spot for achieving both a crispy skin and juicy, tender meat.
A regular-size whole chicken, typically around 4+ pounds, generally takes about one hour to cook at 425°F (220°C). However, cooking times can vary based on several factors, including the actual weight and starting temperature of your chicken (whether it’s cold from the fridge or closer to room temperature), and if the chicken is stuffed, which can extend cooking time considerably.
Basting the chicken with its pan juices is an excellent way to keep it moist and promote even browning of the skin, enriching its flavor. While it’s recommended for the best results, if you’re pressed for time or prefer a more hands-off approach, you don’t strictly need to baste it. The overnight marination in this recipe already ensures a very juicy bird.
The primary distinction between roasting and baking typically lies in the oven temperature used. Roasting generally involves higher temperatures, usually above 400°F (200°C), while baking is done at moderate temperatures, typically 375°F (190°C) or below. As a result, roasting aims to create a deeply browned, crispy exterior, perfect for developing rich flavors and textures. Baking, conversely, tends to yield a softer skin and a more consistently moist, delicate interior.
Yes, it’s highly recommended to allow your whole chicken to come to room temperature for about 30-60 minutes before placing it in the oven. This crucial step helps the chicken cook more evenly from edge to center, preventing the outer layers from drying out while the interior catches up. A cold bird will cook less predictably and can result in unevenly cooked meat.
I consistently recommend roasting chicken breast-side up. This position maximizes the breast’s exposure to the oven’s direct heat, which encourages the skin to become beautifully golden and wonderfully crispy. While some methods suggest starting breast-down, this recipe is optimized for breast-up roasting to achieve our desired crispy skin and succulent breast meat.
Got Leftover Chicken? Try These Recipes…
If you try this incredible herb-roasted chicken recipe, please take a moment to leave a star rating and a comment below, letting us know how much you enjoyed it. Your feedback truly helps!
Print Recipe
Easy Herb-Roasted Chicken
5 Stars
5 from 1 review
- Author: Katya
- Prep Time: 20 minutes
- Cook Time: 1 hour
- Total Time: 1 hour 20 minutes
- Yield: 4 servings
- Category: Main Course
- Method: Roasted
- Cuisine: American
Description
This Herb-Roasted Chicken just might be the easiest whole roast chicken recipe you’ll ever make. All the essential prep work is done the night before, guaranteeing an incredibly juicy, tender, and flavorful bird with minimal effort on cooking day.
Ingredients
- 4 lb. whole chicken
- ⅓ cup olive oil
- 1 large lemon, juiced and zested
- 1 tsp. fresh minced rosemary
- 1 tsp. fresh minced thyme
- 1 Tbsp. fresh minced parsley
- ¾ tsp. garlic powder
- 1 ½ Tbsp. kosher salt (tablespoon and NOT teaspoon, this amount is crucial for the overnight salting technique)
- 1 tsp. black pepper
Instructions
- In a small bowl, thoroughly whisk together the olive oil, lemon juice, lemon zest, minced fresh rosemary, minced fresh thyme, minced fresh parsley, and garlic powder until well combined. Set this aromatic mixture aside.
- Begin by discarding any giblets found inside the chicken cavity. Using paper towels, generously pat the entire chicken dry, both inside the cavity and all over the exterior skin. Place the dried chicken, breast-side up, into a 9×13 inch deep baking dish or a similarly sized roasting pan. Pour the prepared oil and herb mixture over the chicken, ensuring you spread it evenly across all surfaces, including inside the cavity. Liberally season the chicken all over with the kosher salt and black pepper. Pay special attention to seasoning the skin along the backbone, inside the cavity, and carefully under the wings. Take your time with this step, as every inch of the chicken should be well seasoned for optimal flavor and tenderness.
- Once seasoned, cover the baking dish tightly with aluminum foil to prevent air exposure. Transfer the covered chicken to the refrigerator and allow it to marinate overnight (for a minimum of 12 hours, and ideally up to 24 hours). This extended refrigeration period is essential for the flavors to deeply penetrate the meat and for the salt to work its tenderizing magic.
- The next day, when you are ready to roast, preheat your oven to 425°F (220°C). Remove the chicken from the refrigerator and uncover the baking dish. To ensure the chicken cooks evenly and maintains a compact shape, use kitchen string to tie the legs together. Gently tuck the wing tips under the body of the chicken to prevent them from burning. Position the chicken breast-side up in the pan. Allow the chicken to sit at room temperature for about 30-60 minutes while the oven preheats; this helps promote more even cooking.
- Place the chicken in the preheated oven. Roast for approximately 1 hour. If desired, you can baste the chicken with its accumulated pan juices halfway through the roasting time to keep the skin moist and enhance browning. The chicken is fully cooked when an instant-read thermometer inserted into the thickest part of the thigh (without touching bone) registers 165°F (74°C), and when the juices run clear if you make a small incision between a leg and thigh. Once cooked, remove the chicken from the oven and loosely tent it with aluminum foil. Let it rest for 10-15 minutes before carving and serving. This resting period is crucial for the juices to redistribute, ensuring a tender and moist bird.
Notes
- Avoid fresh garlic: Do not use fresh garlic in this recipe, as it tends to burn at high roasting temperatures, leading to a bitter taste. Garlic powder provides the flavor without this risk.
- Salt generously: Take your time when seasoning the chicken with salt. Not only will this add incredible flavor, but the overnight salting technique is also vital for making the chicken exceptionally tender and juicy. Use the full recommended amount of kosher salt.
- Roast on the middle rack: Always roast your chicken on the middle oven rack for even heat distribution. If you notice the skin is browning too much or too quickly on top, simply cover the chicken loosely with aluminum foil to prevent burning while the rest of the chicken finishes cooking.
Nutrition
- Serving Size: 1/4 of chicken (approx.)
- Calories: 711
- Sugar: 0.3 g
- Sodium: 2530.2 mg
- Fat: 30.6 g
- Carbohydrates: 1.8 g
- Protein: 102.2 g
- Cholesterol: 330.9 mg
Originally published November 2021