

Swiss Braided Bread, also famously known as Zopf bread, is a culinary delight renowned for its exquisitely soft, rich, and tender crumb. This traditional sweet bread, enriched with eggs and butter, offers a subtly sweet flavor that makes it a perfect accompaniment to a variety of spreads. Best savored fresh, perhaps with a generous slather of butter or a spoonful of homemade jam, it transforms any meal into a special occasion. Its beautiful braided appearance also makes it a stunning centerpiece for your breakfast or brunch table, proving that simplicity can indeed be elegant. If you appreciate the comforting taste of freshly baked bread, this recipe is destined to become a cherished favorite in your kitchen.
For those eager to explore more delightful bread recipes, consider trying our 5-ingredient pumpkin bread for a quick and easy fall treat, or our healthy pumpkin bread for a wholesome option. This versatility extends to even making the most incredible French toast, thanks to its soft texture and perfect hint of sweetness.
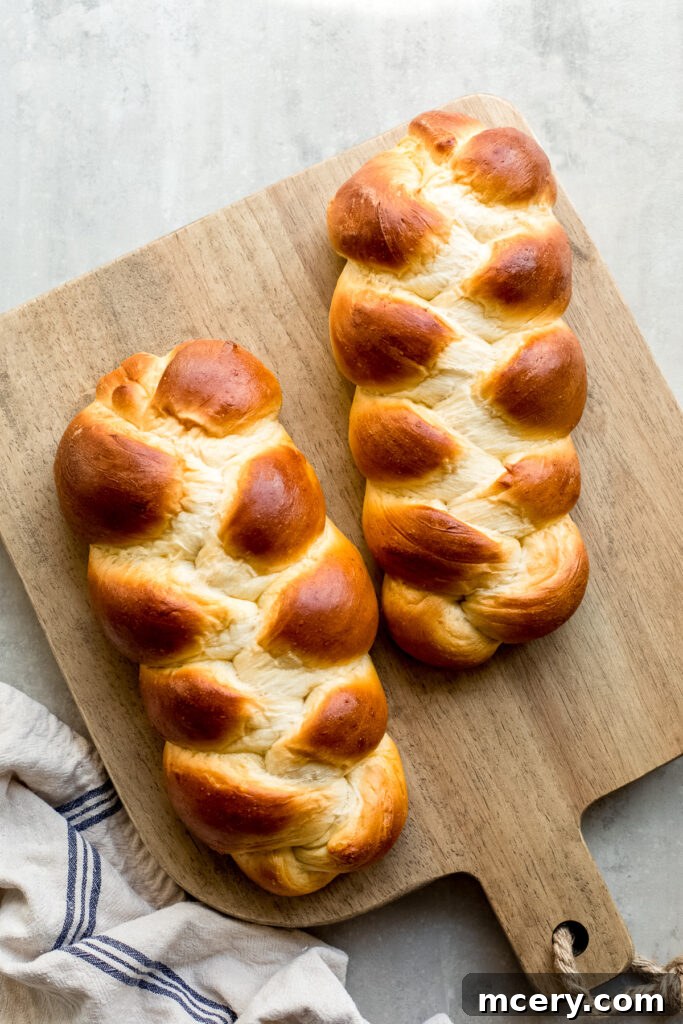
Zopf bread strikes a wonderful balance, being simple enough for an everyday morning toast yet sophisticated enough to grace your most festive holiday gatherings. Imagine serving this magnificent braided loaf at your Easter brunch or Mother’s Day celebration, its golden crust and inviting aroma creating a truly memorable experience. It requires only the most basic accompaniments – perhaps some fresh butter, a selection of artisanal jams, or even a drizzle of honey – to truly shine. Its inherent softness and just-right sweetness also make it the ideal foundation for an unforgettable French toast, turning a simple breakfast staple into a gourmet experience. This recipe is more than just bread; it’s an invitation to create cherished memories around the table.
What is Swiss Braided Bread (Zopf)?
Swiss Braided Bread, or Zopf (pronounced “tsopf”), is a distinctive, rich, plaited loaf deeply rooted in Swiss culinary tradition. Its name, “Zopf,” literally means “braid” in Swiss German, referring to its characteristic woven appearance. Traditionally, Zopf is baked and enjoyed on Sundays, marking it as a special bread for family gatherings and leisurely weekend breakfasts. This beloved sweet bread shares many similarities with other brioche-style breads, particularly Challah, in its soft, eggy, and slightly sweet profile. Both breads boast a tender crumb and a beautiful golden crust, achieved through a careful preparation process.
However, a key distinction lies in their fat content. While Challah bread typically uses oil, traditional Swiss Zopf incorporates a generous amount of butter. This addition of butter is crucial, imparting a luxurious richness and an unparalleled tenderness to the bread, as well as contributing to its exquisite flavor. The core ingredients for an authentic Zopf loaf are simple yet essential: high-quality flour, fresh milk, farm-fresh eggs, unsalted butter, and active yeast. These components combine to form a pliable, soft dough that is then expertly divided and braided, most commonly into a classic three-strand plait. Once baked, the loaf emerges from the oven with a stunning golden hue, promising a melt-in-your-mouth texture.
Key Ingredients for Perfect Braided Bread
Creating an outstanding Swiss Braided Bread relies on a few simple, high-quality ingredients, each playing a vital role in the bread’s texture, flavor, and appearance:
- Milk: For the ultimate soft and tender crumb, whole milk is highly recommended. Its fat content adds richness and moisture that significantly enhances the bread’s overall texture and flavor profile. While non-dairy or low-fat milk can be used as alternatives, be aware that they may result in a slightly less rich and tender loaf.
- Sugar: Beyond just adding a subtle sweetness, sugar is crucial for activating and feeding the yeast, encouraging it to produce the carbon dioxide necessary for the dough to rise beautifully. Both cane sugar and granulated sugar work effectively in this recipe, contributing to the bread’s golden crust through caramelization during baking.
- Salt: A pinch of salt is essential to balance the sweetness of the sugar and enhance all the other flavors in the bread. It also plays a role in regulating yeast activity, ensuring a steady and controlled rise. Without salt, bread can taste bland and the yeast might rise too quickly.
- Butter: This is the secret ingredient that truly sets Swiss Braided Bread apart. Unsalted butter adds incredible flavor, richness, and contributes significantly to the dough’s tenderness, resulting in a soft, almost brioche-like texture. Ensure you use unsalted butter to control the overall saltiness of the bread. Melting it gently before incorporating ensures it blends seamlessly into the dough.
- Yeast: Active dry yeast is specified for this recipe. It’s a leavening agent that, when activated by warm liquid and sugar, produces gas that makes the bread rise. Proper yeast activity is crucial for a light and airy loaf. Understanding how to work with yeast is fundamental to successful bread baking.
- Eggs: Eggs are integral to the structure, richness, and color of Zopf bread. One egg is incorporated into the dough, providing moisture, binding ingredients, and contributing to the bread’s tender crumb and golden hue. An additional egg is used for the egg wash, which is brushed over the loaf before baking to give it a beautiful, shiny, golden-brown crust.
- Flour: All-purpose flour is the foundation of this recipe. Its moderate protein content is ideal for achieving the perfect balance of softness and structure in the bread. While this recipe has not been tested with other types of flour, sticking to all-purpose will ensure consistent results. Using the correct amount, plus a little extra for dusting, is key for handling the dough.
Essential Recipe Tips & Notes for Success
While making Swiss Braided Bread is a rewarding experience, a few key tips can ensure your loaf turns out perfectly golden, soft, and delicious:
- Patience is Key for Rising: This recipe is not inherently difficult, but it absolutely requires patience, particularly during the rising stages. Dough development is a biological process, and rushing it will compromise the final texture and flavor of your bread. Ensure your dough has ample time to complete its two rises. A warm, draft-free environment (like a slightly warmed oven that has been turned off, or near a sunny window) is ideal for encouraging the yeast. Look for the dough to visibly double in size, indicating sufficient proofing.
- Handling Sticky Dough: The dough for Zopf bread is designed to be soft and slightly sticky, which contributes to its tender crumb. Don’t be alarmed if it feels a bit challenging to handle initially. To prevent excessive sticking, generously flour your hands and your work surface. A light dusting of flour on the dough itself before kneading can also help. The goal is to incorporate just enough flour to make it manageable, not to dry it out, as this would result in a tough loaf. Gently kneading with floured hands will help achieve that smooth, elastic consistency.
- Yeast Varieties: While this recipe calls for active dry yeast, instant yeast can be used as a substitute. The main difference lies in their activation process: active dry yeast usually requires proofing in warm liquid first, whereas instant yeast can often be mixed directly with the dry ingredients. If using instant yeast, be mindful that it tends to work faster. Keep a closer eye on your dough during the rising times to prevent over-proofing, which can lead to a less desirable texture.
- Even Baking: For a consistently golden and beautifully baked loaf, using a parchment-lined baking sheet is highly recommended. Parchment paper prevents sticking and aids in even heat distribution, ensuring the bottom of your bread doesn’t burn while the top bakes to perfection. Always preheat your oven thoroughly before placing the bread inside to ensure an even bake from the start.
How to Make Swiss Braided Bread: A Step-by-Step Guide
Crafting this exquisite braided bread involves two crucial rising stages, contributing to its signature light and airy texture:
- 1st rise: Approximately 2 hours, occurring after the dough has been initially mixed and kneaded.
- 2nd rise: About 1 hour, taking place once the dough has been expertly shaped into its beautiful braid.
Below is a comprehensive overview of the process. For precise measurements and detailed step-by-step instructions, please refer to the recipe card towards the end of this article.
Step 1: Making the Dough
Begin by combining the yeast, sugar, and salt in a large mixing bowl. Warm the milk to about 110°F (43°C) – it should feel comfortably warm to the touch, not hot, as excessive heat can kill the yeast. Pour the warm milk over the yeast mixture. Whisk gently to ensure everything is combined, then loosely cover the bowl with a clean kitchen towel. Allow this mixture to sit undisturbed for 5-10 minutes. During this time, the yeast will activate, and the mixture should become visibly frothy, indicating that your yeast is alive and ready to work its magic.
Once the yeast mixture is frothy, gently whisk in the melted butter (ensure it’s slightly cooled, not hot) and the lightly beaten egg. Incorporate these wet ingredients thoroughly until well combined, creating a rich base for your dough.
Gradually add the all-purpose flour to the wet mixture, stirring it in two additions with a sturdy wooden spoon. Continue to stir until all the flour is incorporated and the mixture comes together to form a shaggy, somewhat cohesive ball of dough. It will still be quite sticky at this stage, which is perfectly normal.
Transfer the sticky dough onto a lightly floured surface. With lightly floured hands, begin to knead the dough. The process of kneading develops the gluten, which gives the bread its structure and elasticity. Continue kneading for about 8-10 minutes, or until the dough transforms into a smooth, elastic ball that is no longer overly sticky. If it becomes too sticky, add a very small amount of flour, but be careful not to add too much, as this can make the bread tough. Once kneaded, shape the dough into a smooth ball. Place this ball into a clean, lightly greased bowl, turning it once to coat all sides. Cover the bowl tightly with plastic wrap and then with a clean kitchen towel. Allow the dough to rise in a warm, draft-free place until it has doubled in size, typically taking about 2 hours.
Step 2: Braiding the Dough
This recipe yields two beautiful loaves of Swiss braided bread. Consider baking one for immediate enjoyment and freezing the other for a convenient treat later – freezing instructions are provided further below. Once the dough has completed its first rise and doubled in size, gently punch it down to release the accumulated air. Transfer the dough onto a lightly floured surface and divide it into two equal portions, forming two separate balls.
Take one of the dough balls and divide it into three equal pieces. On your lightly floured surface, roll each of these three pieces with your hands into long “snakes” or ropes, approximately 12-13 inches in length. Aim for an even thickness along the entire length of each rope to ensure a uniform bake and a beautiful braid.
Now comes the fun part: braiding! Lay the three ropes parallel to each other. Securely press the ends of the three ropes together at one end to form a strong anchor. Then, proceed to braid them as you would braid hair – crossing the right strand over the middle, then the left strand over the new middle, and repeating this pattern. Maintain a firm yet gentle hand to keep the braid even and tight, but not so tight that it tears the dough. Once braided, gently press the other ends together to seal, and tuck them neatly underneath the loaf for a clean finish. Repeat this process for the second loaf.
Carefully place the braided loaves onto a large baking sheet lined with parchment paper, ensuring there is enough space between them for expansion during the second rise. Cover the loaves with a clean kitchen towel and let them rise for an additional hour in a warm, draft-free place. This second rise is crucial for developing the final light and airy texture of the bread.
Step 3: Baking to Golden Perfection
Preheat your oven to 400°F (200°C). While the oven heats, prepare the egg wash: combine one lightly beaten egg yolk with 1 tablespoon of water. Gently brush each risen loaf with this egg wash. The egg wash is what gives Swiss Braided Bread its characteristic glossy, golden-brown crust. Bake the loaves on the middle rack of your preheated oven for 18-23 minutes, or until they are deeply golden brown and sound hollow when tapped on the bottom.
Once baked, remove the bread from the oven and let it cool on the baking sheet for about 10 minutes before transferring it to a wire rack. Allowing the loaves to cool completely on a wire rack ensures air circulation, preventing the bottom from becoming soggy and promoting an even texture throughout. Each recipe yields two generous loaves, approximately 12 slices each, perfect for sharing or savoring over several days.
Creative Ways to Serve Swiss Braided Bread
Swiss Braided Bread is wonderfully versatile, making it your new go-to recipe if you adore lightly sweetened bread for any meal or snack. Its delightful flavor and tender texture pair beautifully with a wide array of toppings and accompaniments. Whether you prefer it toasted or fresh from the loaf, here are some inspiring ways to enjoy it:
- Classic Spreads: The simplest pleasures are often the best. Serve slices with creamy butter, your favorite fruit jam (why not try our easy jam recipe made with chia seeds?), or a generous dollop of cream cheese.
- Nut Butter & Fruit: For a satisfying and energizing breakfast or snack, spread with creamy peanut butter or almond butter and top with slices of fresh banana or other seasonal fruits.
- Gourmet Twist: Elevate your experience by pairing it with soft brie cheese, a drizzle of golden honey, and a scattering of fresh berries. The combination of sweet, savory, and tangy is simply divine.
- Savory Enhancements: While inherently sweet, Zopf bread can also complement savory elements. Consider it as a base for light open-faced sandwiches with thinly sliced ham or turkey, or even a simple avocado toast with a sprinkle of everything bagel seasoning.
- French Toast Excellence: Its rich, eggy nature makes it an unparalleled choice for French toast. Soak thick slices in an egg custard and pan-fry until golden for a truly indulgent breakfast.
- Bread Pudding Base: Day-old Zopf bread is fantastic for making a luxurious bread pudding. Its buttery crumb absorbs custard beautifully, creating a wonderfully decadent dessert or brunch item.
Beyond daily enjoyment, this braided bread truly shines as a show-stopping centerpiece for any brunch spread. Its stunning appearance and delightful flavor make it a perfect companion to a variety of other delicious brunch recipes, such as:
- Salmon Yogurt Spread with bagels, offering a fresh and savory contrast.
- Crepes with Lemon Greek Yogurt for a light and zesty option.
- Strawberry Filled Pancakes to satisfy any sweet tooth.
- Pasta Frittata for a hearty and unique brunch item.
- Ham and Egg Muffins for a convenient and protein-rich choice.
- Healthy Morning Muffins for a wholesome addition to the spread.
Storage & Freezing Instructions
Proper storage is essential to maintain the freshness and deliciousness of your homemade Swiss Braided Bread. Luckily, this bread stores beautifully, whether you plan to enjoy it over a few days or save it for a later date.
- Room Temperature Storage (Baked Bread): Once baked and completely cooled, Swiss Braided Bread can be stored in an airtight container or a large Ziploc bag at room temperature for up to 3-5 days. To keep it at its best, avoid refrigeration, as this can dry out the bread more quickly. For extra freshness, you can wrap it in plastic wrap before placing it in an airtight container.
- Freezing Raw Dough: This is an excellent option for meal prep or enjoying fresh bread on demand. Prepare the dough through step 6 (after the first rise). Once the dough has risen, gently punch it down to release the air. Wrap the dough tightly in plastic wrap, then place it into a freezer-friendly airtight container or heavy-duty freezer bag. It can be stored in the freezer for up to 3 months. When you’re ready to bake, thaw the dough overnight in the refrigerator. The next day, let the dough sit at room temperature for approximately 30 minutes to an hour until it softens and becomes pliable again, then proceed with step 7 (braiding) and the subsequent steps.
- Freezing Baked Loaf: You can also freeze a fully baked and cooled loaf of Swiss Braided Bread. Wrap the cooled bread tightly in plastic wrap, then in aluminum foil or place it in a freezer-safe bag. It will keep well in the freezer for up to 3 months. To thaw, simply remove the wrapped loaf from the freezer and place it on the counter at room temperature for several hours or overnight. For a “freshly baked” experience, you can gently reheat the thawed loaf in a preheated oven at 350°F (175°C) for 10-15 minutes until warmed through.
Video: How to Make Swiss Braided Bread
A video tutorial demonstrating the steps for making Swiss Braided Bread would typically be embedded here. Please check back soon for the full visual guide on how to prepare this delicious loaf!
You May Also Like These Delicious Recipes
If you have tried and loved this Swiss Braided Bread recipe, please take a moment to leave a star rating and share your thoughts in the comments section below. Your feedback is greatly appreciated!
Swiss Braided Bread
5 out of 5 stars based on 3 reviews
Author: Katya
Prep Time: 3 hour 30 minutes
Cook Time: 25 mins
Total Time: 3 hours 55 minutes
Yield: 2 loaves
Category: Bread
Method: Baked
Cuisine: American
Description
Lightly sweetened Swiss braided bread with a soft and airy texture. It’s delicious with butter or jam, perfect for breakfast, brunch, or any time.
Ingredients
- 3 Tbsp. cane sugar
- 3 tsp. kosher salt
- 1 packet (¼ oz.) Active Dry Yeast (2 ¼ tsp.)
- 1 ½ cups whole milk
- 2 Tbsp. unsalted butter, melted and slightly cooled
- 1 large egg, lightly beaten
- 4 cups (570 grams) all-purpose flour, plus extra for rolling the dough
Egg Wash
- 1 egg yolk, lightly beaten
- 1 Tbsp. water
Instructions
- To make the dough: Add sugar, salt, and yeast to a large bowl.
- Heat the milk on the stove or in the microwave until warm to the touch, about 110°F. Pour warm milk on top of the yeast mixture. Whisk gently to combine, then loosely cover with a clean kitchen towel and allow to sit for 5-10 minutes. The mixture will be frothy after 5-10 minutes, indicating yeast activation.
- Add the melted butter and egg to the frothy yeast mixture. Gently whisk to combine thoroughly.
- Add flour in two additions. Stir with a wooden spoon until the mixture comes together to form a shaggy ball.
- Transfer the dough to a floured work surface. Using lightly floured hands, knead the dough until it’s smooth and elastic, approximately 8-10 minutes. Add a small amount of flour if the dough is too sticky, but aim for a soft dough. Shape into a ball.
- Place the dough into a clean greased bowl. Cover it with plastic wrap and a clean kitchen towel. Let rise in a warm, draft-free place until doubled in size, about 2 hours.
- To braid the dough: Transfer the risen dough onto a lightly floured surface and knead it gently a few times to de-gas. Divide the dough into two equal balls. For each ball, divide it further into 3 equal pieces and roll out each piece into 12-13-inch long ropes or “snakes.”
- Braid the ropes by pressing the 3 pieces together very securely at one end, then braid them as you would braid hair. Seal the second end by pressing the three pieces together and tucking them neatly under the loaf.
- Place the braided loaves on a large parchment-lined baking sheet. Cover with a clean kitchen towel and allow to rise for an additional hour in a warm place. Ensure there’s plenty of room for the dough to rise and expand.
- To bake: Preheat the oven to 400 degrees F (200°C). Combine the egg yolk with water to make an egg wash and brush each loaf generously with the wash. Bake on the middle rack for 18-23 minutes or until golden brown and shiny.
- Remove from the oven and let cool on the pan for 10 minutes, then transfer to a wire rack to cool completely before slicing and serving. This recipe makes 2 loaves, yielding about 12 slices each.
Notes
- Storing: Store the baked bread, well-wrapped, at room temperature for up to 5 days.
- Freezing: You can freeze the baked and cooled bread for up to 3 months. Wrap tightly in plastic wrap and then foil. Thaw at room temperature. Alternatively, freeze the raw dough after the first rise; wrap tightly and thaw overnight in the refrigerator before shaping and baking.
Nutrition
- Serving Size: 1 slice
- Calories: 99
- Sugar: 1.6 g
- Sodium: 303.8 mg
- Fat: 2.6 g
- Carbohydrates: 15.6 g
- Protein: 3.1 g
- Cholesterol: 19.6 mg